Jump to a step
Step 1
Register your school
It takes about two minutes. You become the school's admin (principal).
- 1Go to school.synthixx.com/signup, enter your name, email and a password, or use Continue with Google.
- 2We email you a 6-digit code from info@synthixx.com. Type it in to confirm your email.
- 3Enter your institution's name, type (school, college or university), phone and address, then press Create school.
- 4Your school gets a 6-digit school code. Parents and students use it to sign in, so keep it handy.
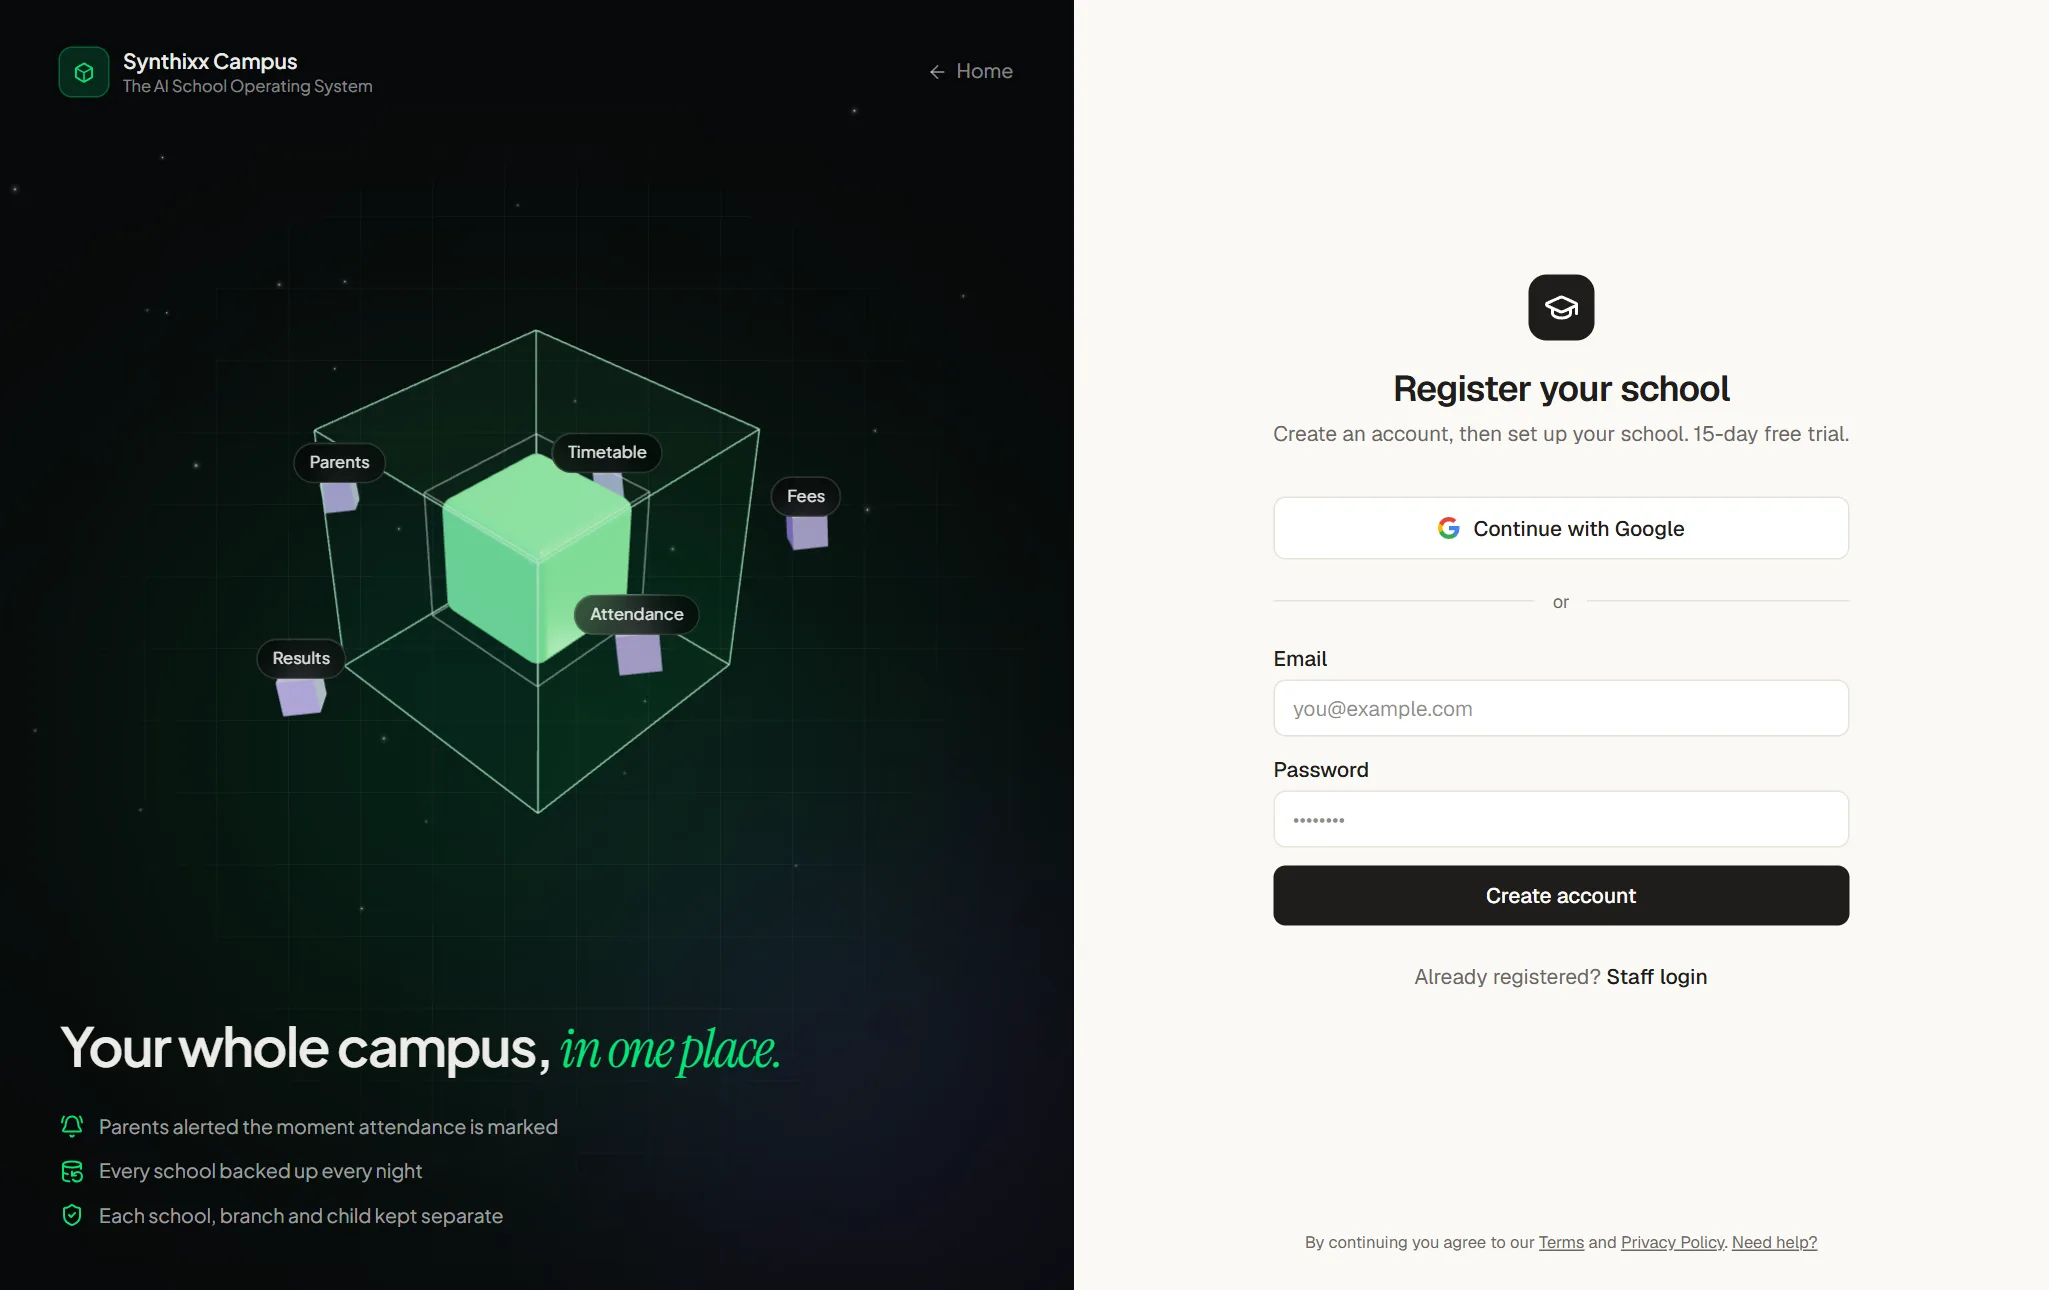
New schools start with a free trial of the full plan, and get 10% off the first plan bought within 48 hours.
Step 2
Your dashboard
Everything important on one screen: students, teachers, fees collected and pending, today's attendance, and charts.
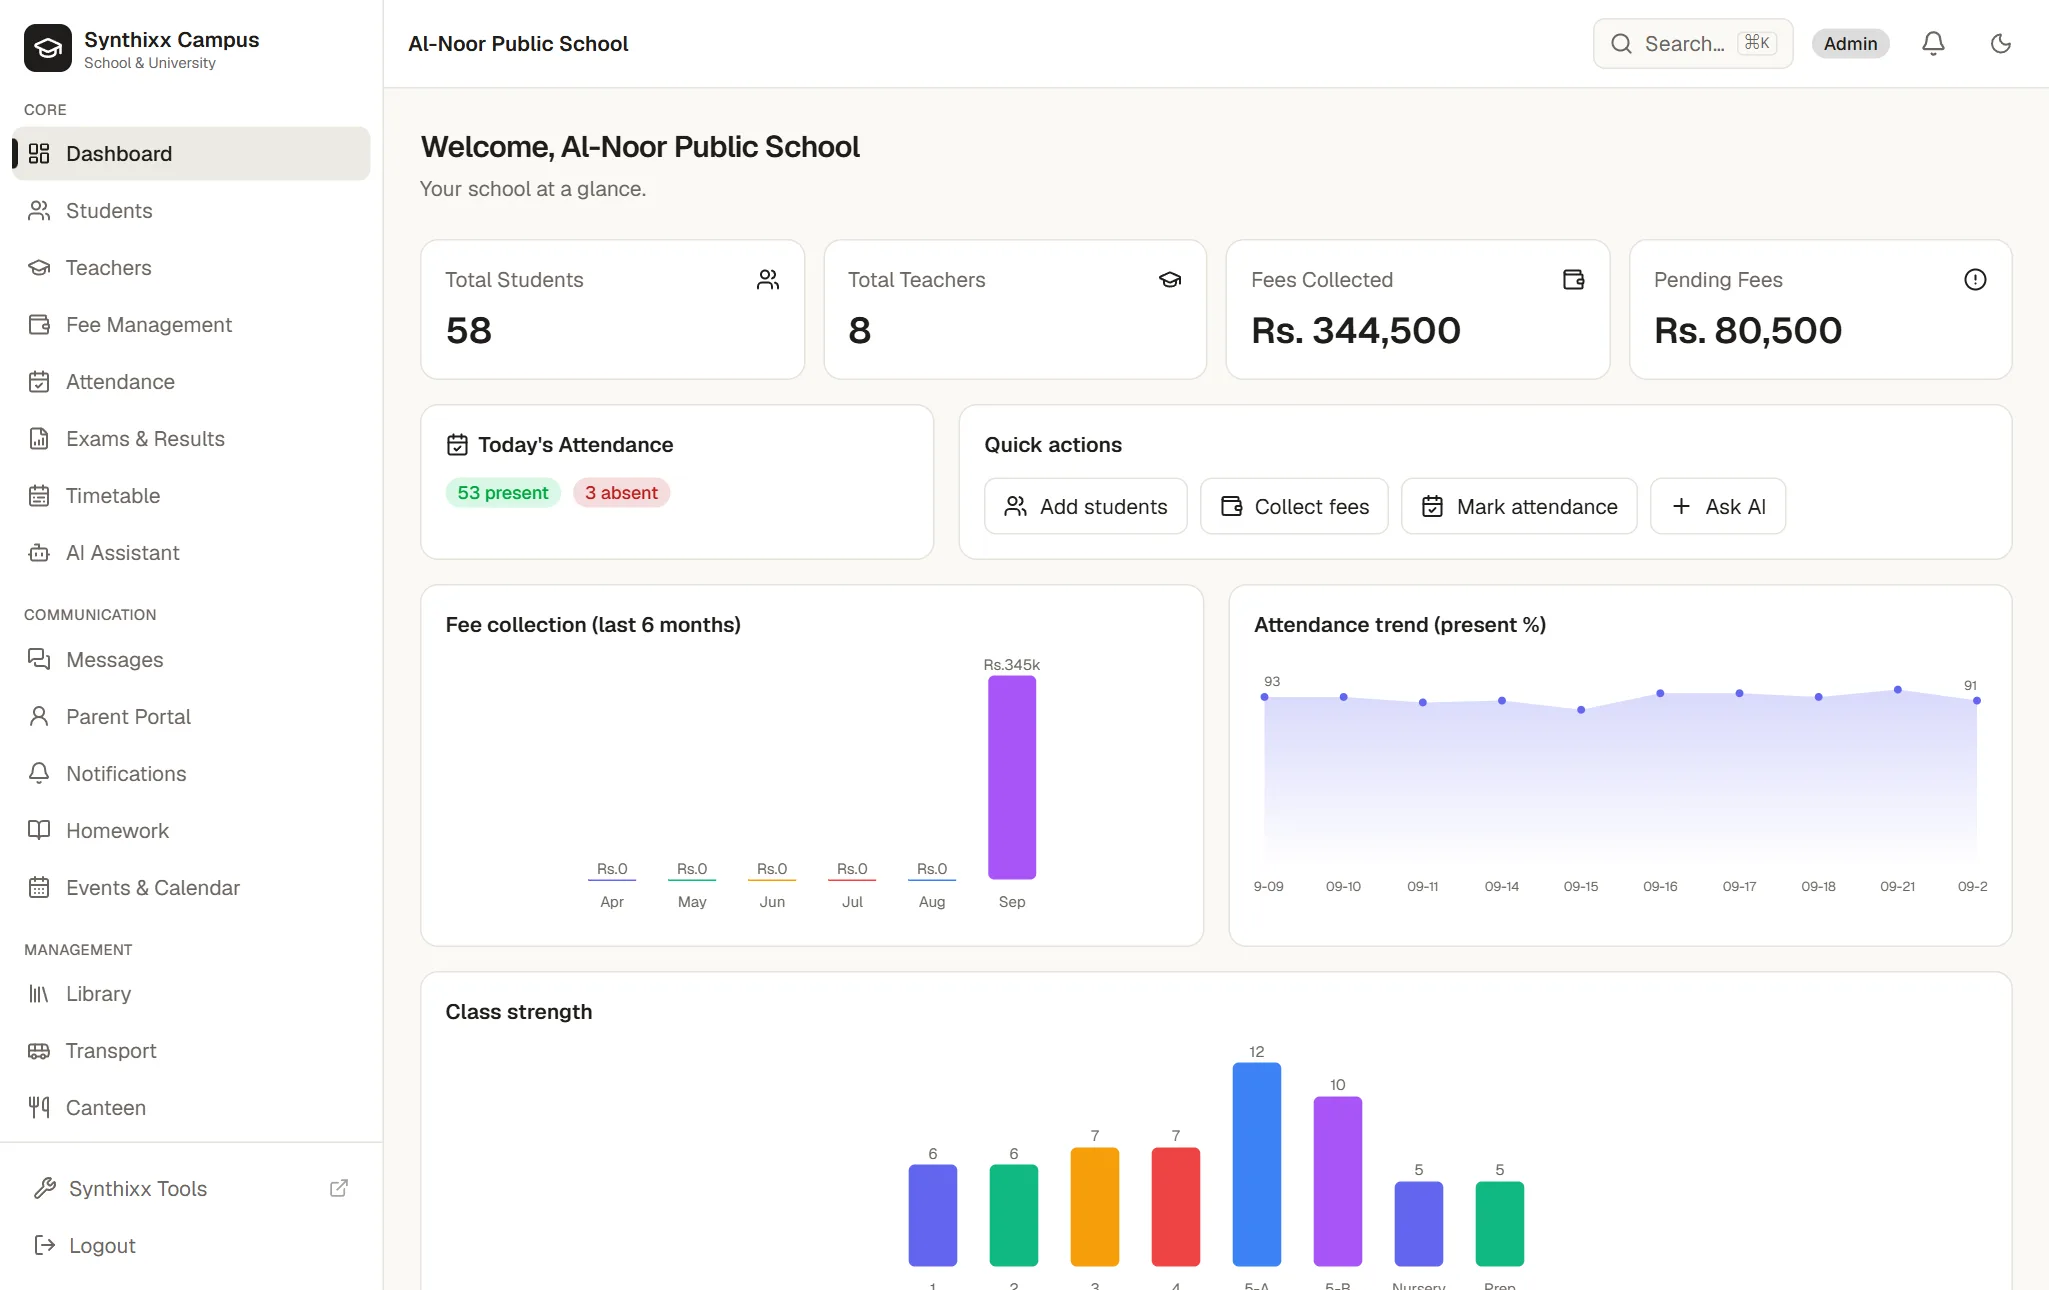
- 1The menu on the left has every module. It only shows what each person's role is allowed to use: a teacher sees fewer items than the principal.
- 2Use Search (or Ctrl + K) to jump to any student or page.
- 3Quick actions take you straight to adding students, collecting fees, marking attendance or asking the AI.
Step 3
Bring your old data
Coming from another software or an Excel register? Upload the file once and Synthixx sets everything up.
- 1Open Administration → Data Import (or Students → Import) and choose what you're importing: Students, Teachers & staff or Fee dues.
- 2Upload your Excel (.xlsx) or CSV file. Column names don't have to match ours: “GR No”, “Father Cell #”, “Class/Grade” and “D.O.B” are recognised automatically.
- 3Check the matched columns. Anything we don't have a place for (like “Transport Route”) is kept as an extra detail, so nothing is lost.
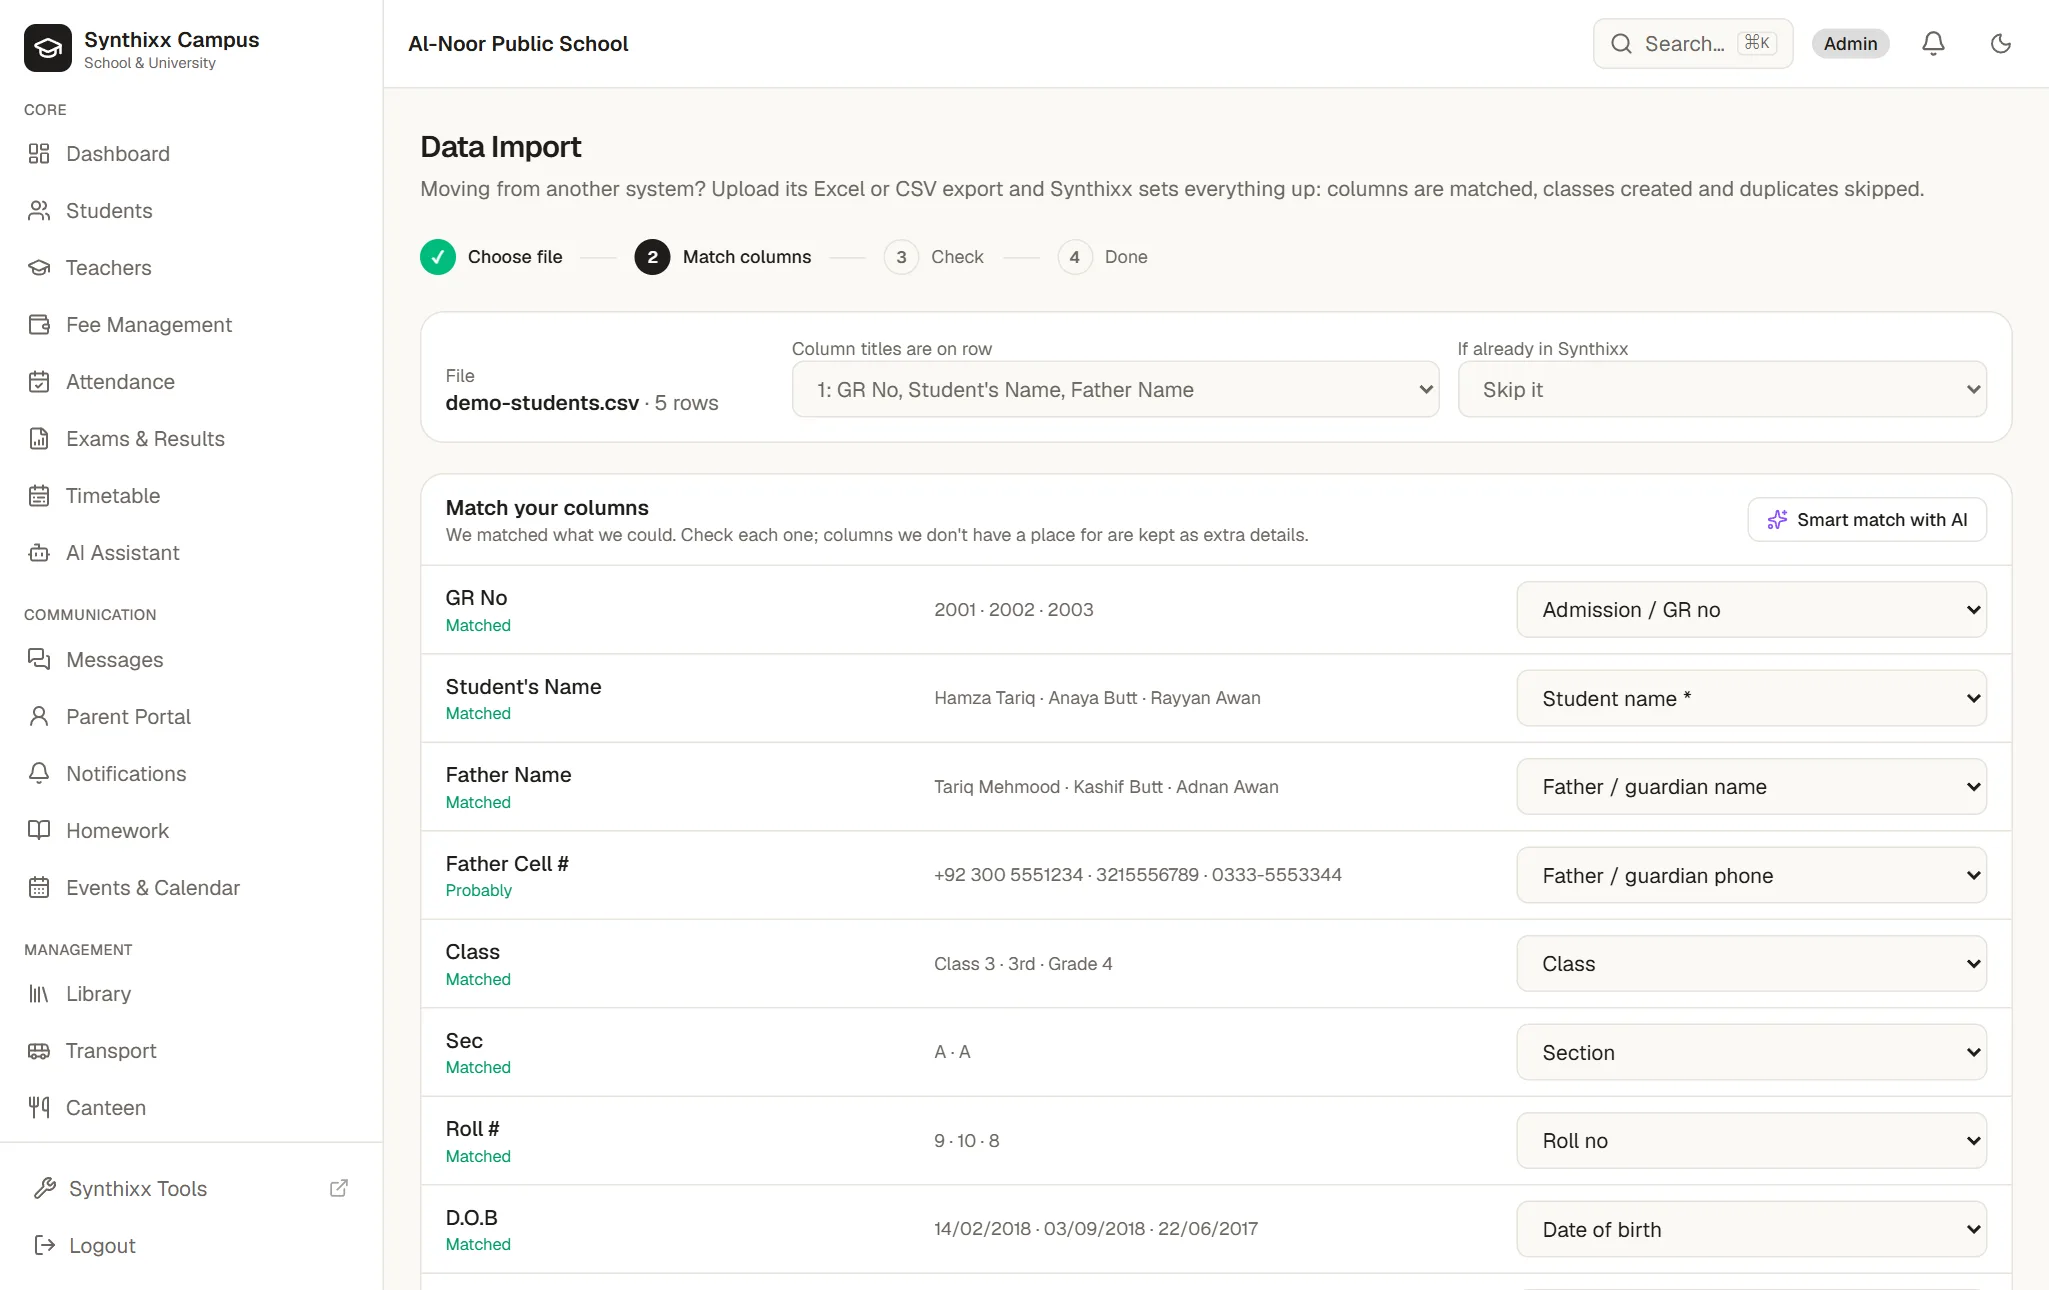
- 1Press Check. Nothing is saved yet. You see every row marked Add, Update, Skip or Problem, with the reason.
- 2Students who are already in Synthixx are skipped, so importing the same file twice is safe. Classes like “5th”, “V” and “Class 5” all become 5, and phone numbers are cleaned to 03XXXXXXXXX.
- 3Press Import. Made a mistake? Undo in the import history removes exactly what that import added.
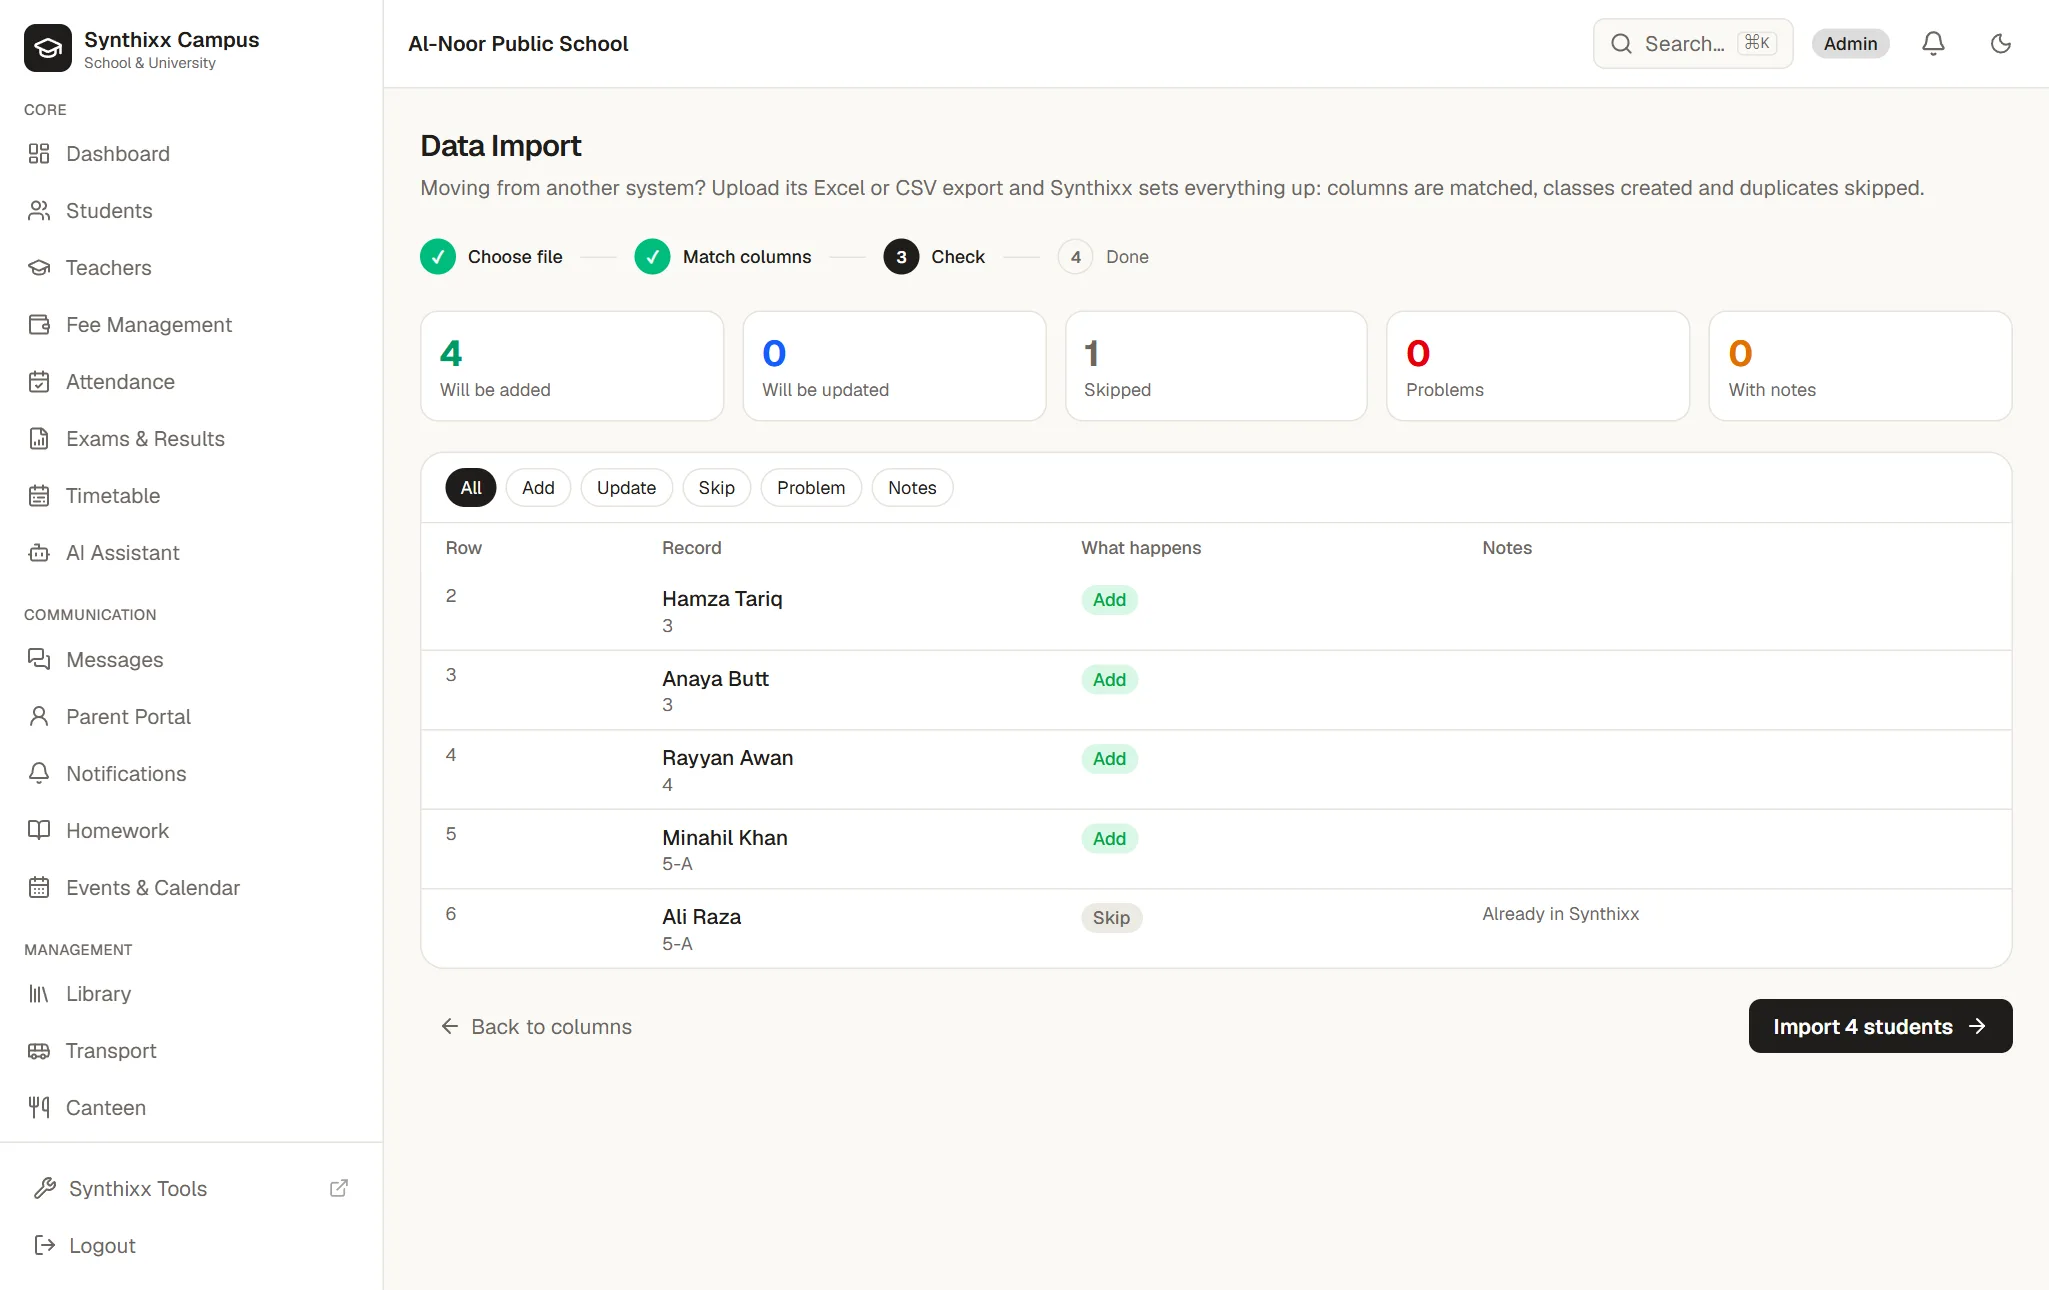
Download a Sample file on the import page if you're starting from scratch. Import students first, then fee dues.
Step 4
Students & their login codes
Add students one by one with Add Student, or import them. Then give each family their login code.
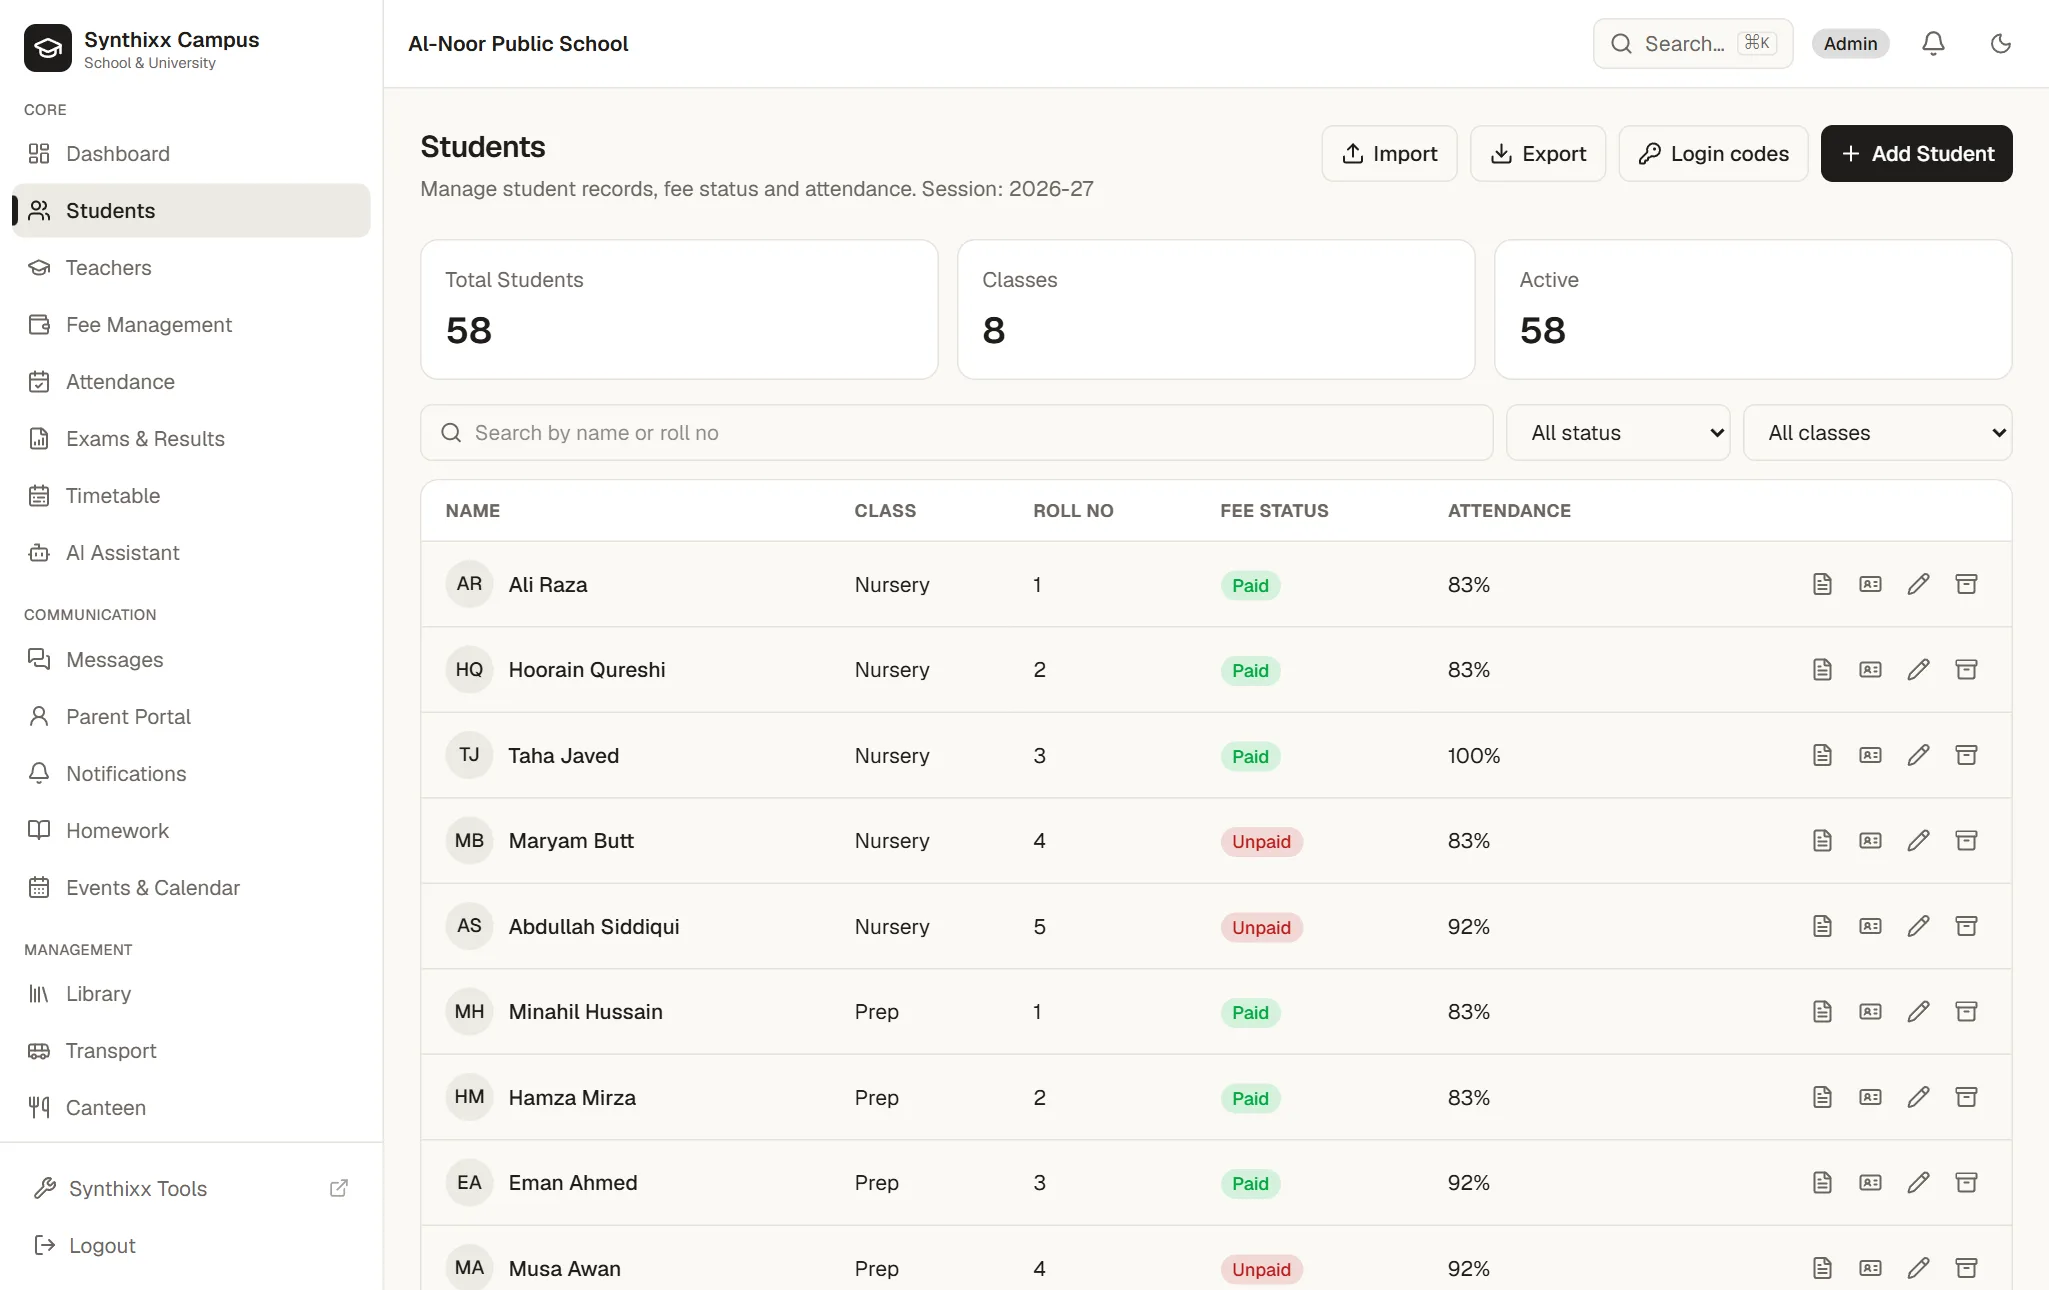
- 1Press Login codes on the Students page. Every student has a private Student ID code like
M9QR-T44T. - 2Press Print slips to print one slip per student with the school code and their Student ID code, and send them home.
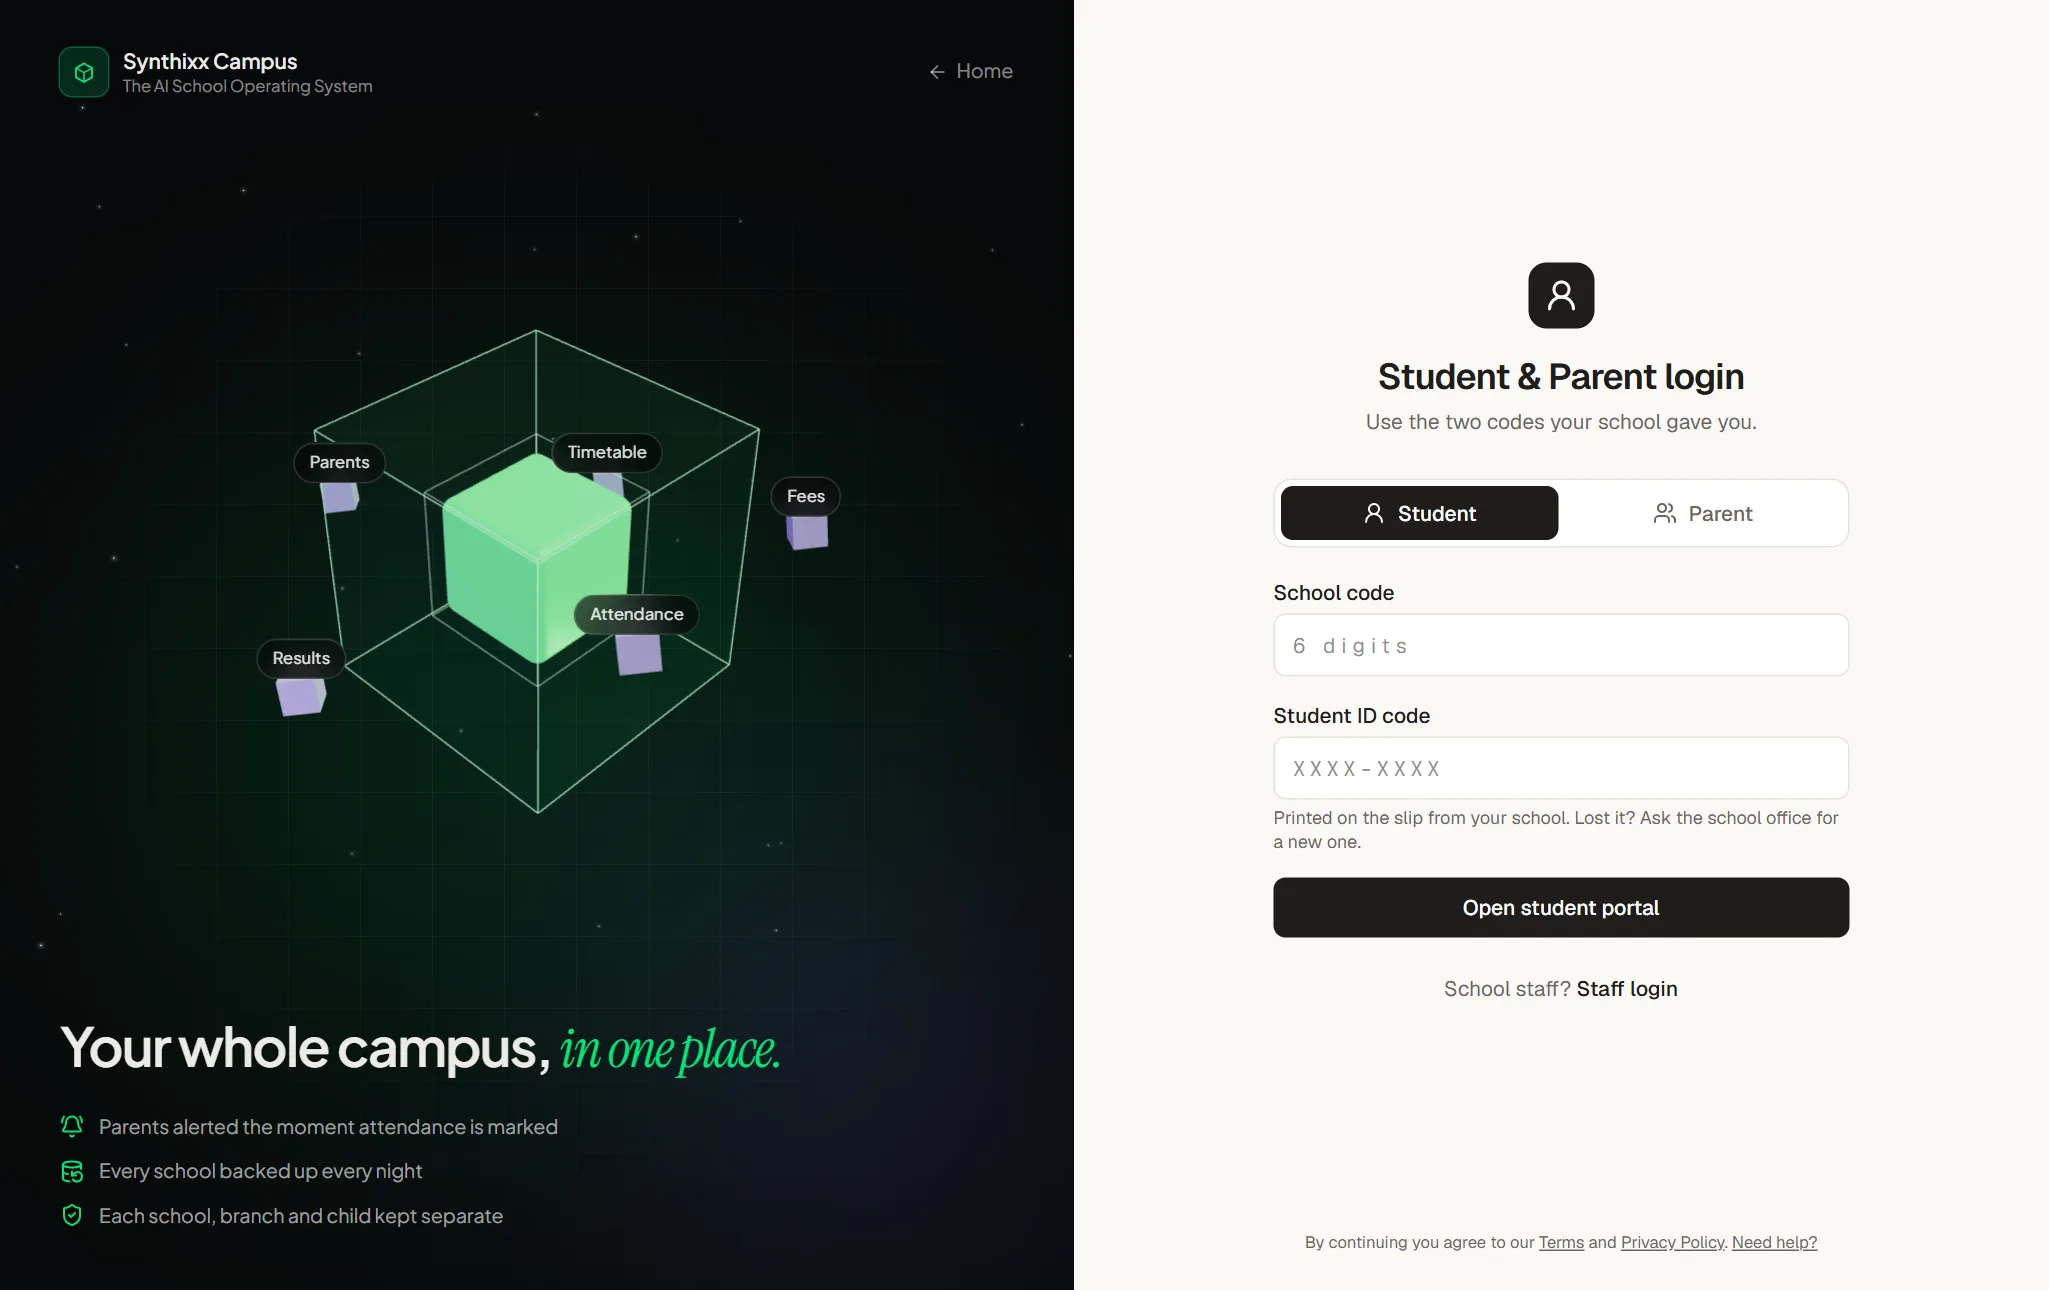
- 3Parents and students sign in at /student-login with the school code + Student ID code. They see only their own child.
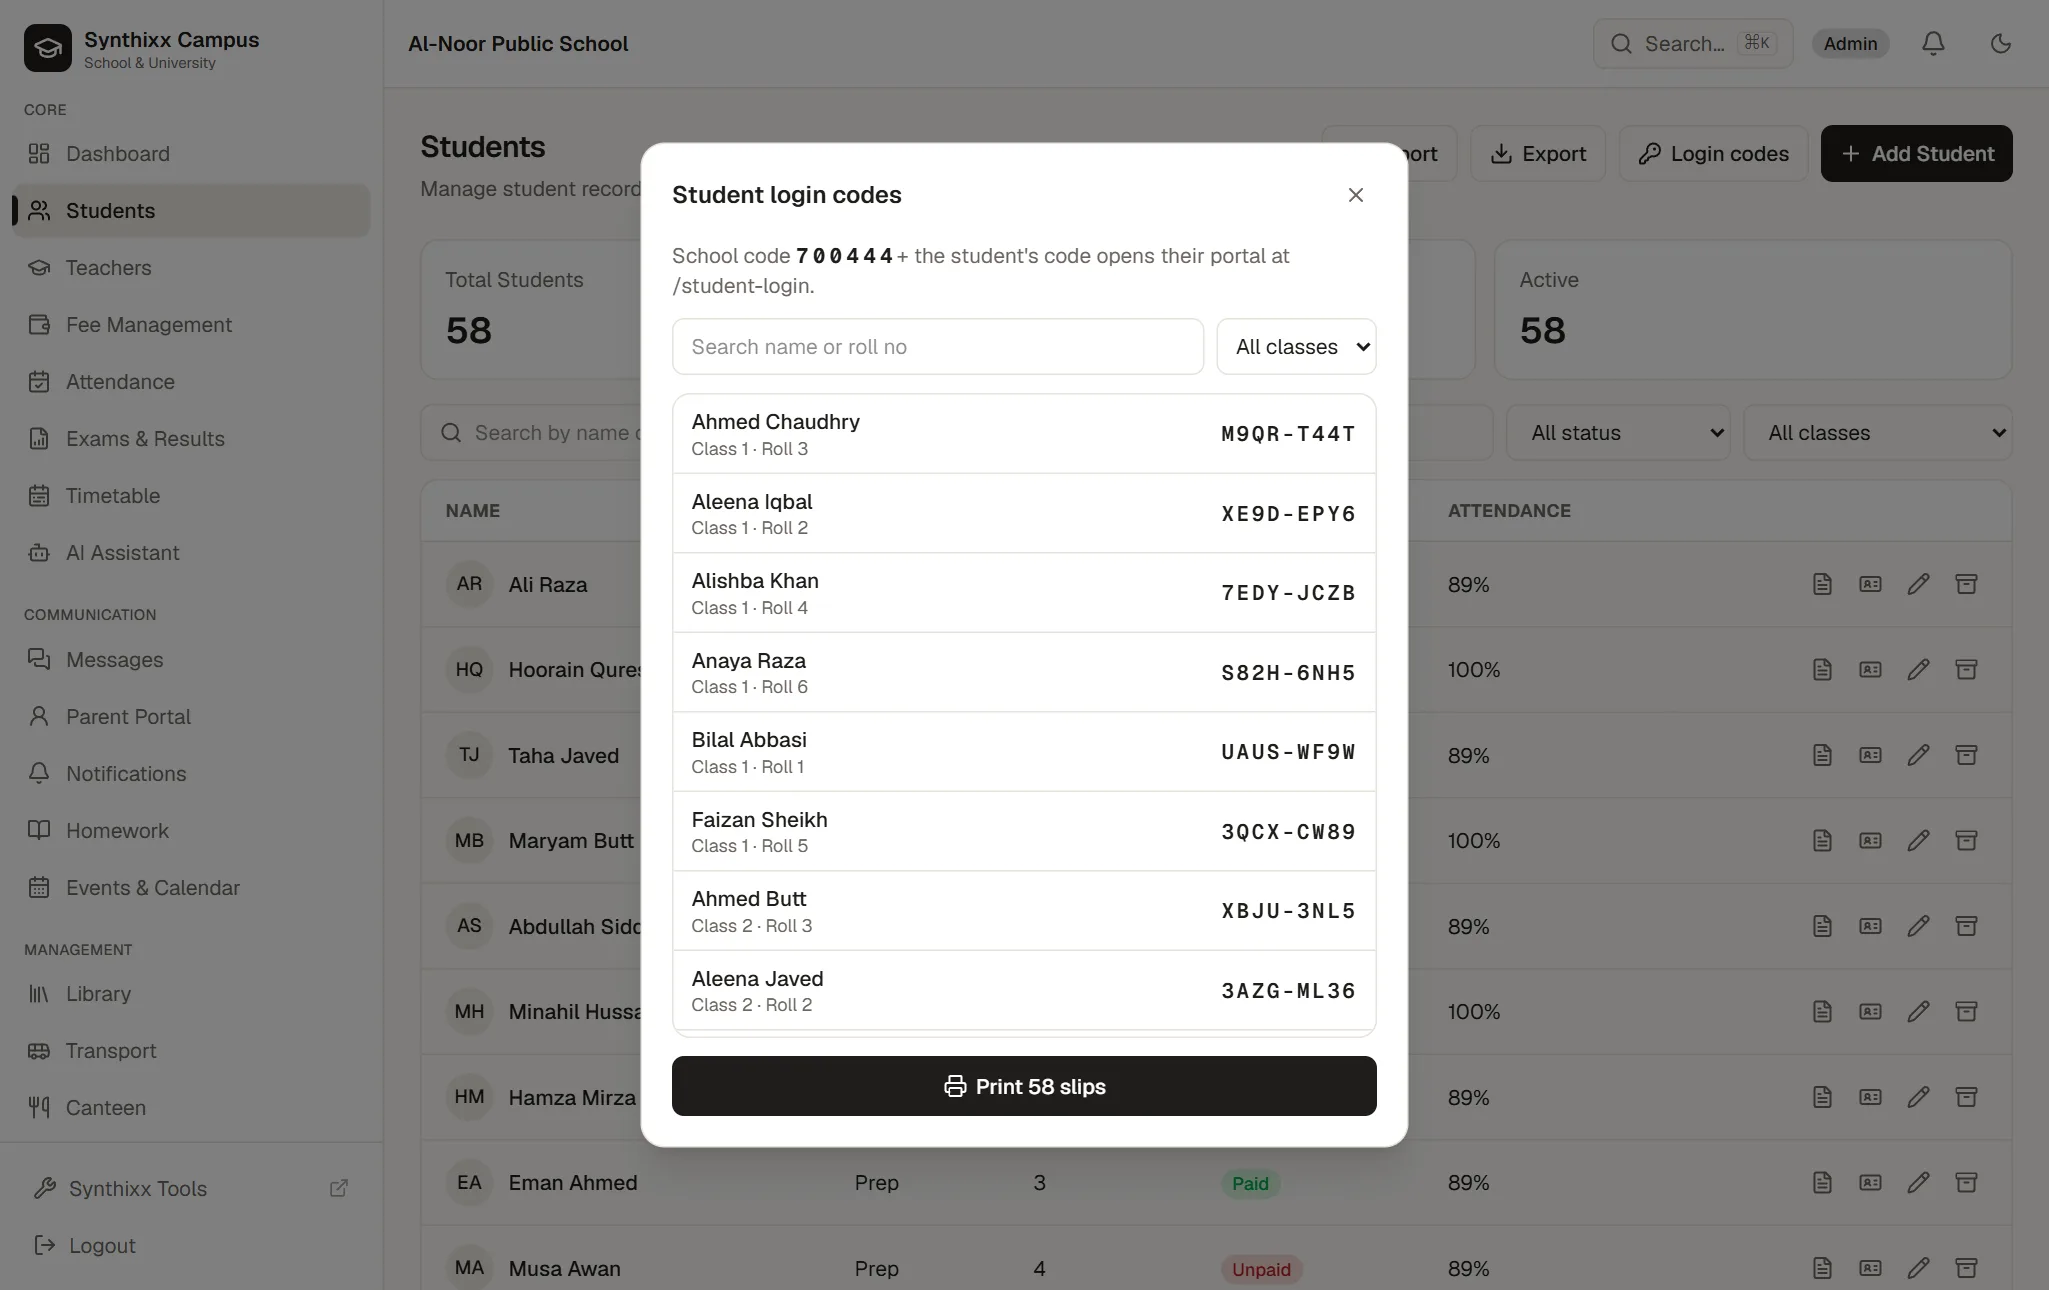
Lost a slip? Reset that student's code from the same window. The old code stops working straight away.
Step 5
Teachers & staff logins
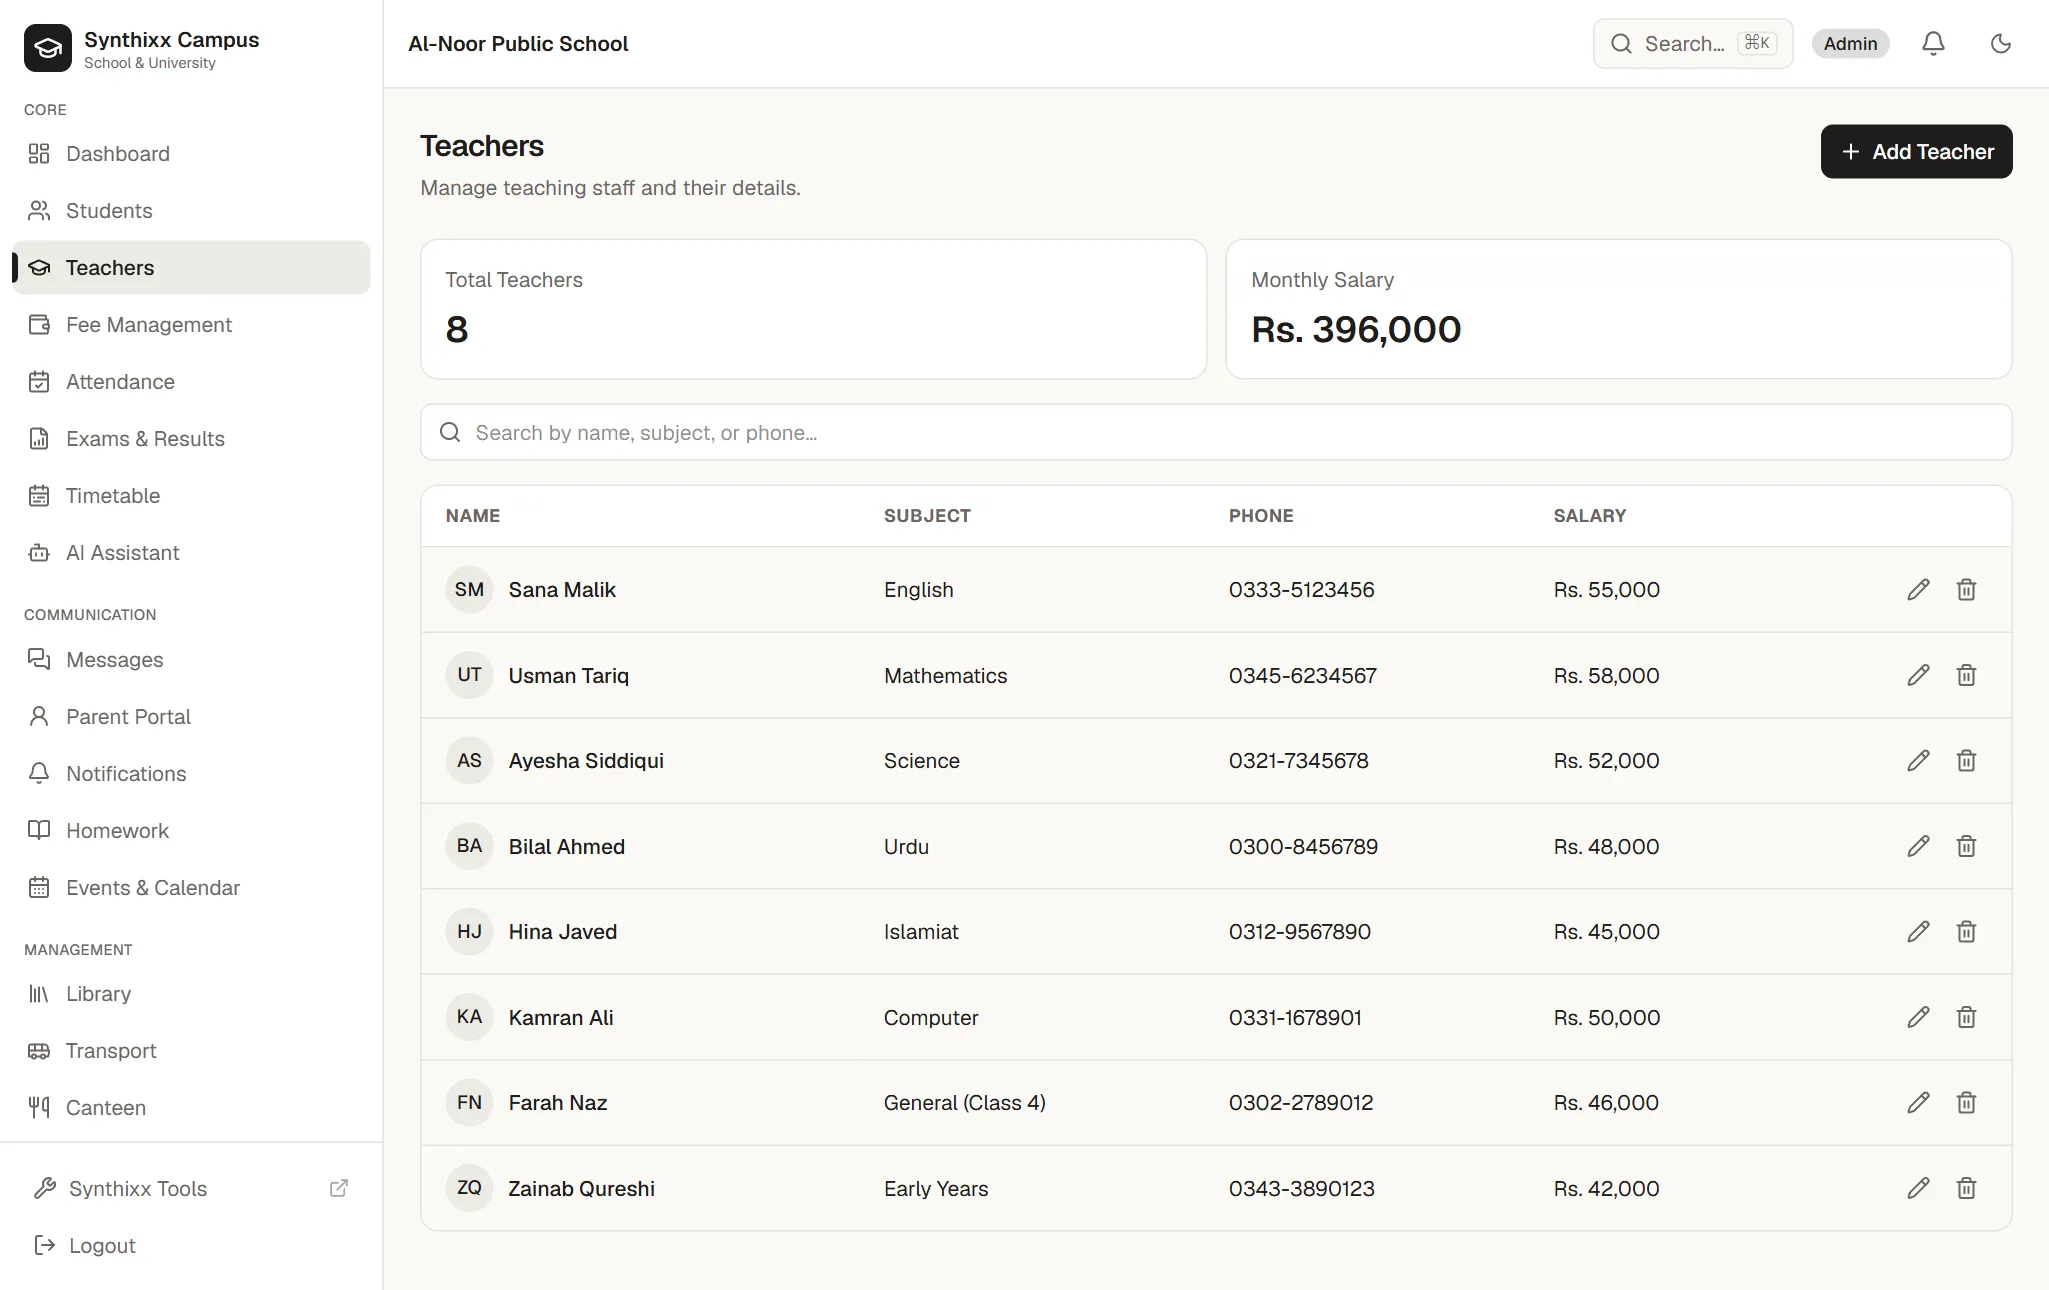
Add your teachers, then invite the staff who should sign in.
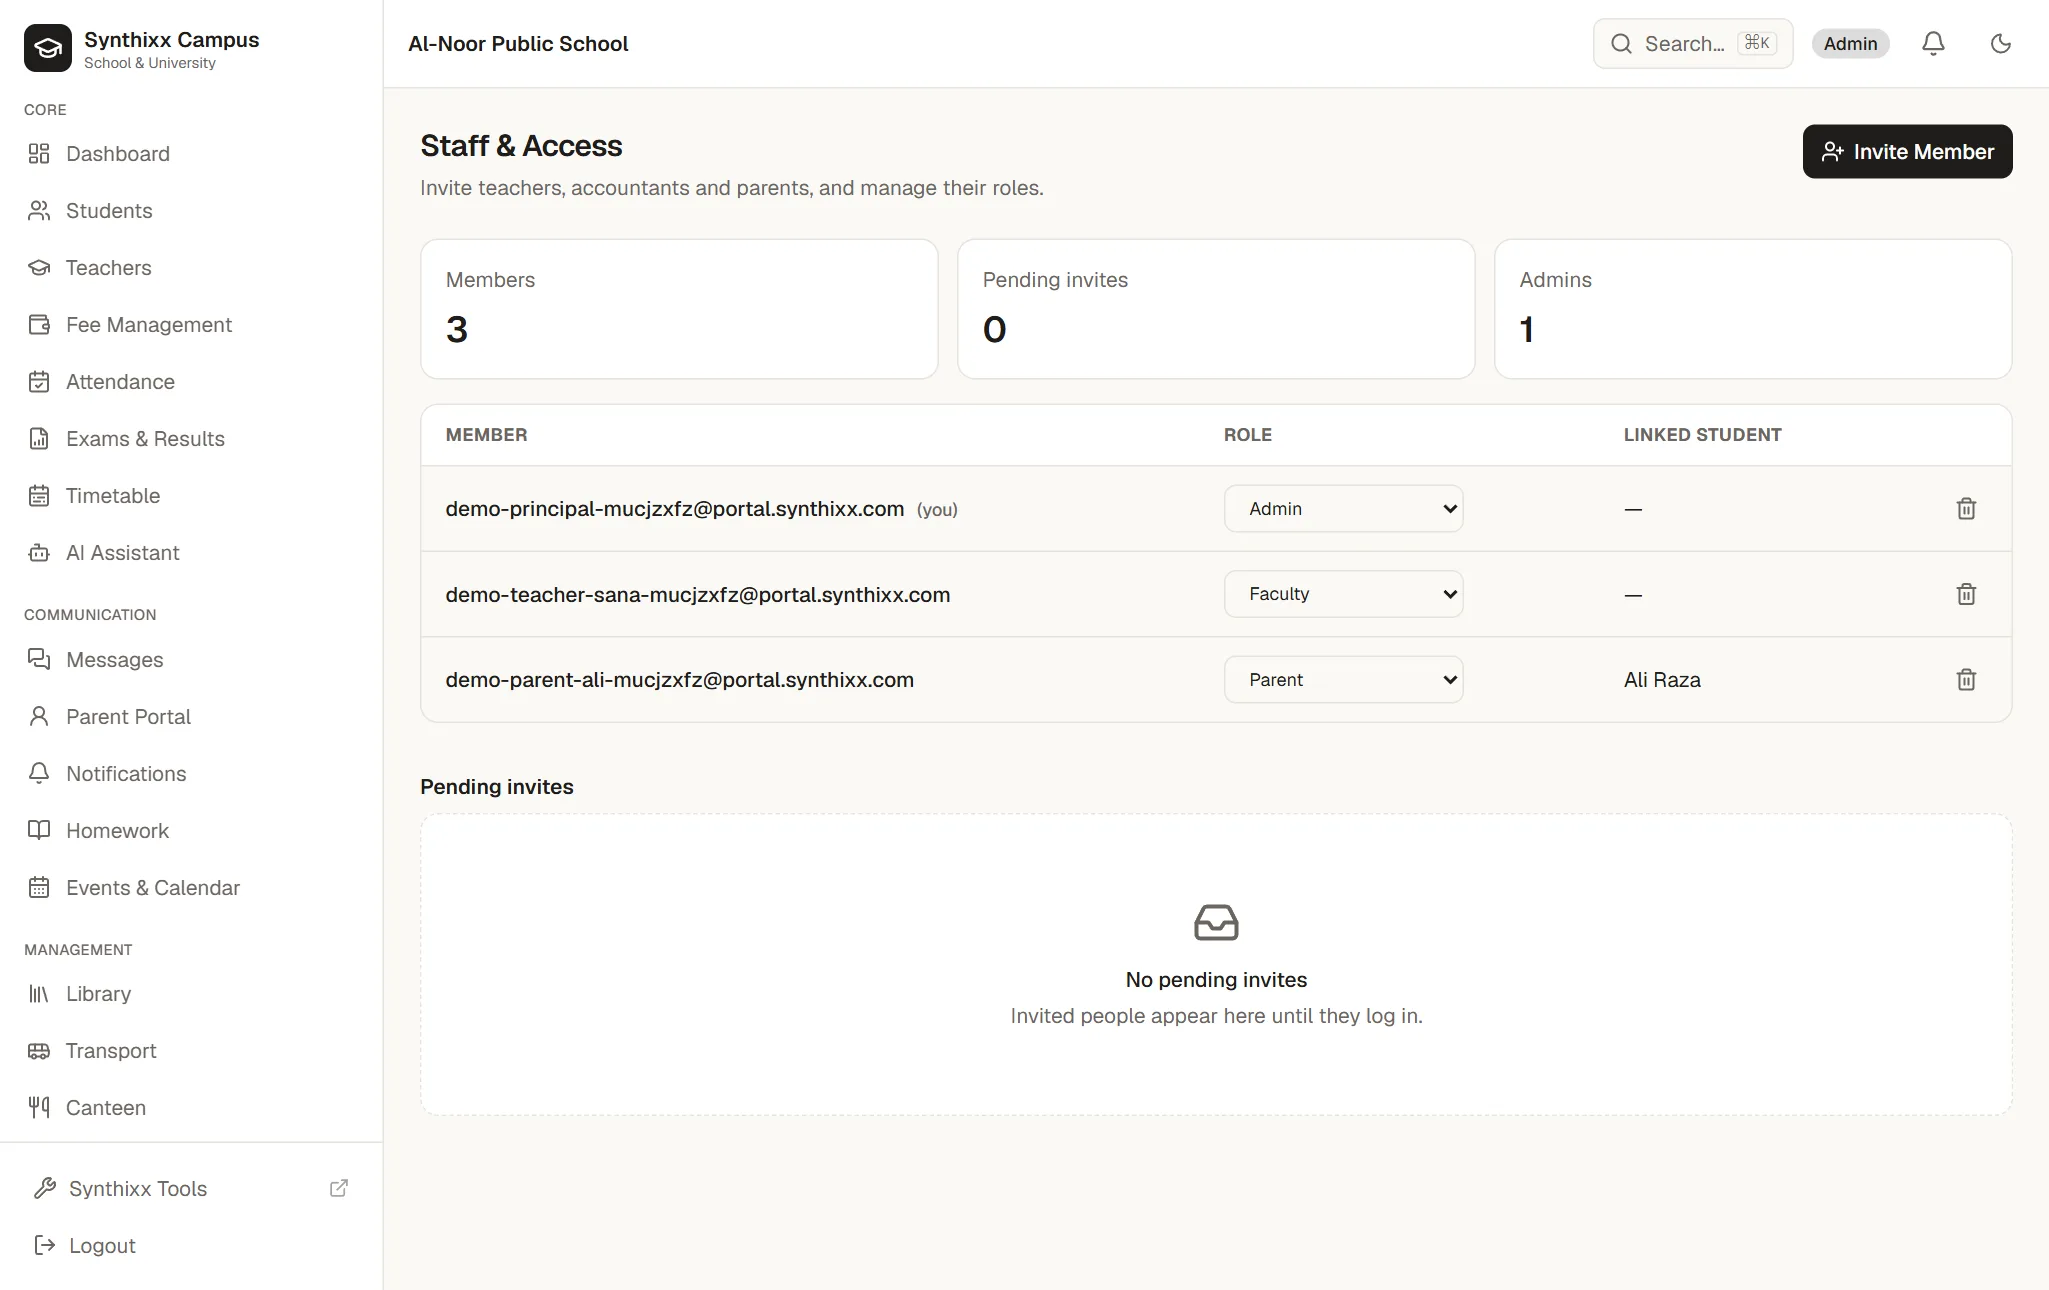
- 1Open Staff & Access, press Invite Member and invite each person by email as an Admin, Teacher or Accountant. They sign in at /login.
- 2Each role sees only its own work. For example, a teacher sees their classes, and an accountant sees fees and payroll.
- 3With more than one branch, staff can be locked to one campus, so they only see that branch.
Step 6
Classes & timetable
Set up classes and sections in Academics, and build the timetable by hand or with AI.
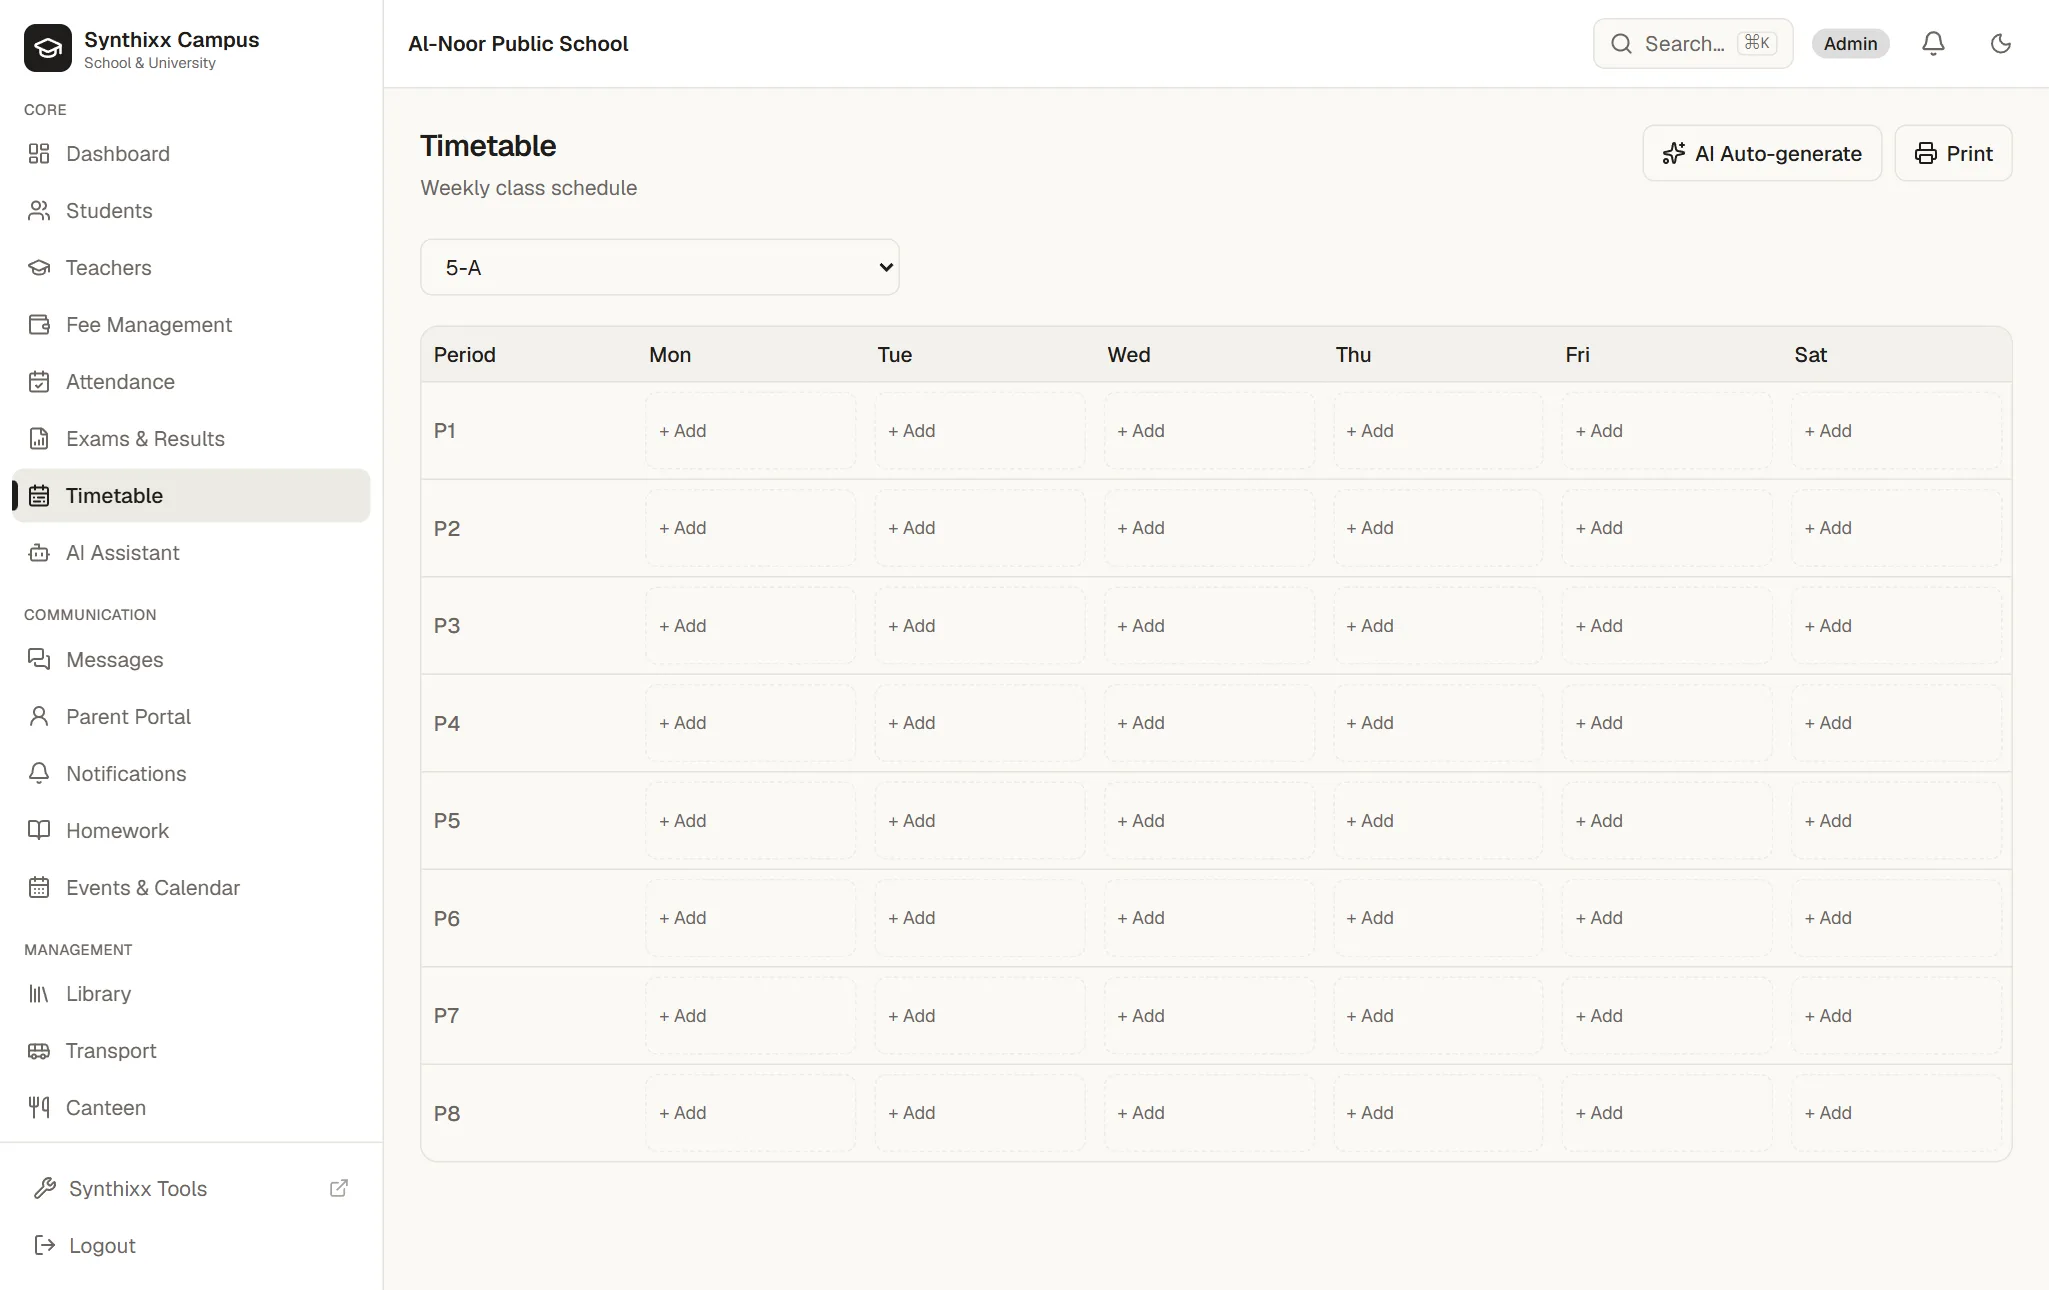
- 1In Academics, add classes and sections and choose each section's class teacher.
- 2In Timetable, add periods, or press AI Auto-generate for a balanced first draft you can edit.
- 3A teacher's classes (class teacher and timetable) decide which students they can mark and which parents they can message.
Step 7
Attendance & instant parent alerts
Mark the register in seconds, or scan QR cards at the gate or in class.
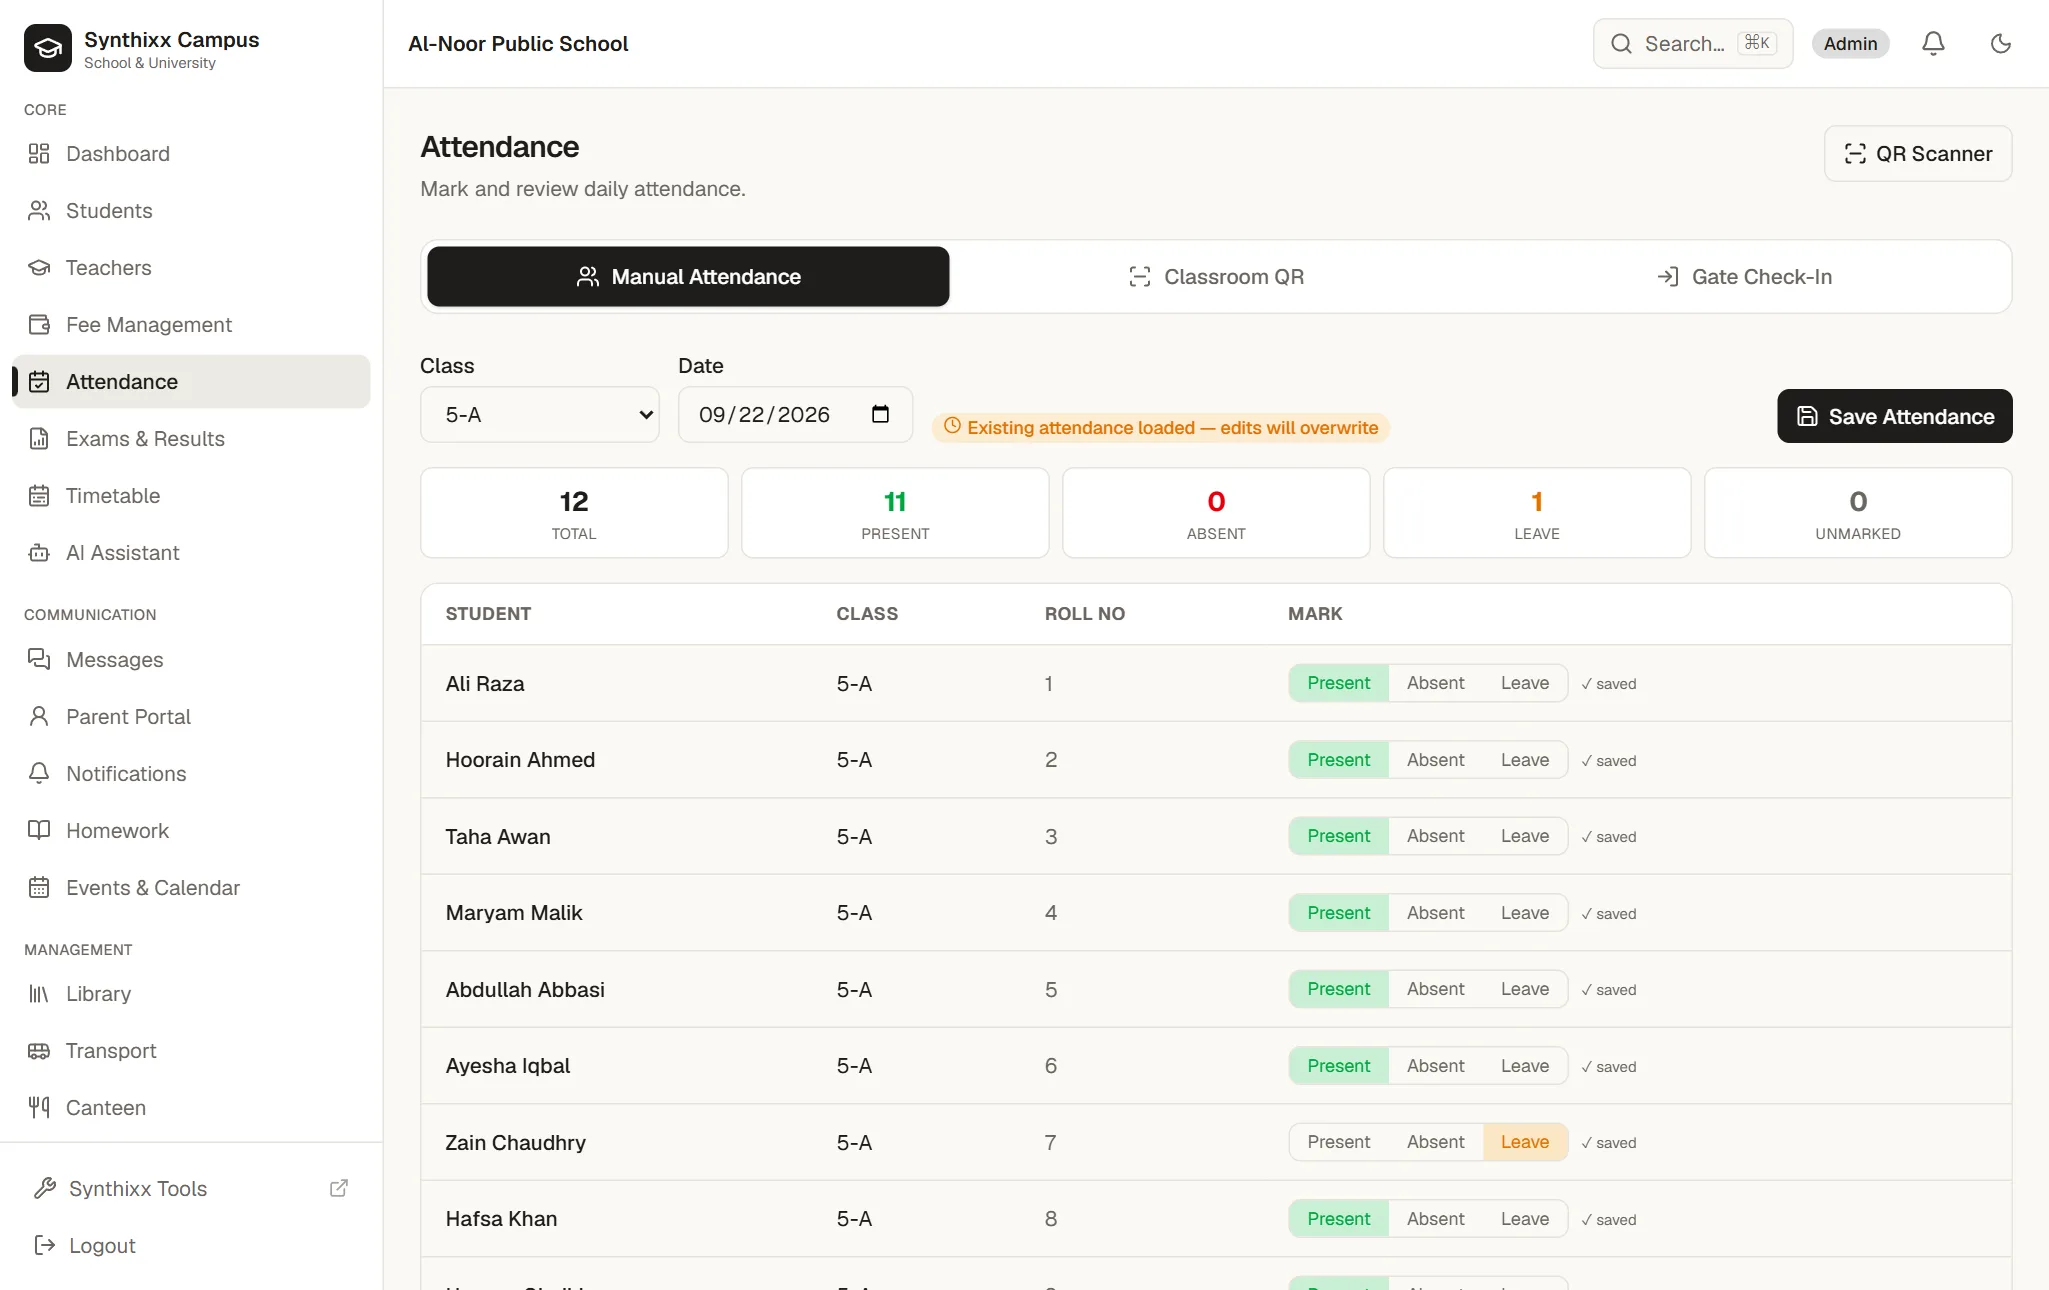
- 1Open Attendance, choose the class and date, mark each student and press Save Attendance.
- 2Or use Gate Check-In or Classroom QR to scan students' QR cards with the phone camera.
- 3Parents get an alert straight away, in the app and on their phone: reached school (with the time), absent or on leave. Choose which alerts go out in Settings.
A manual mark is never overwritten by a later scan. The register stays the source of truth.
Step 8
Fees
Generate a month's fees for everyone in one click, collect payments, and print receipts.
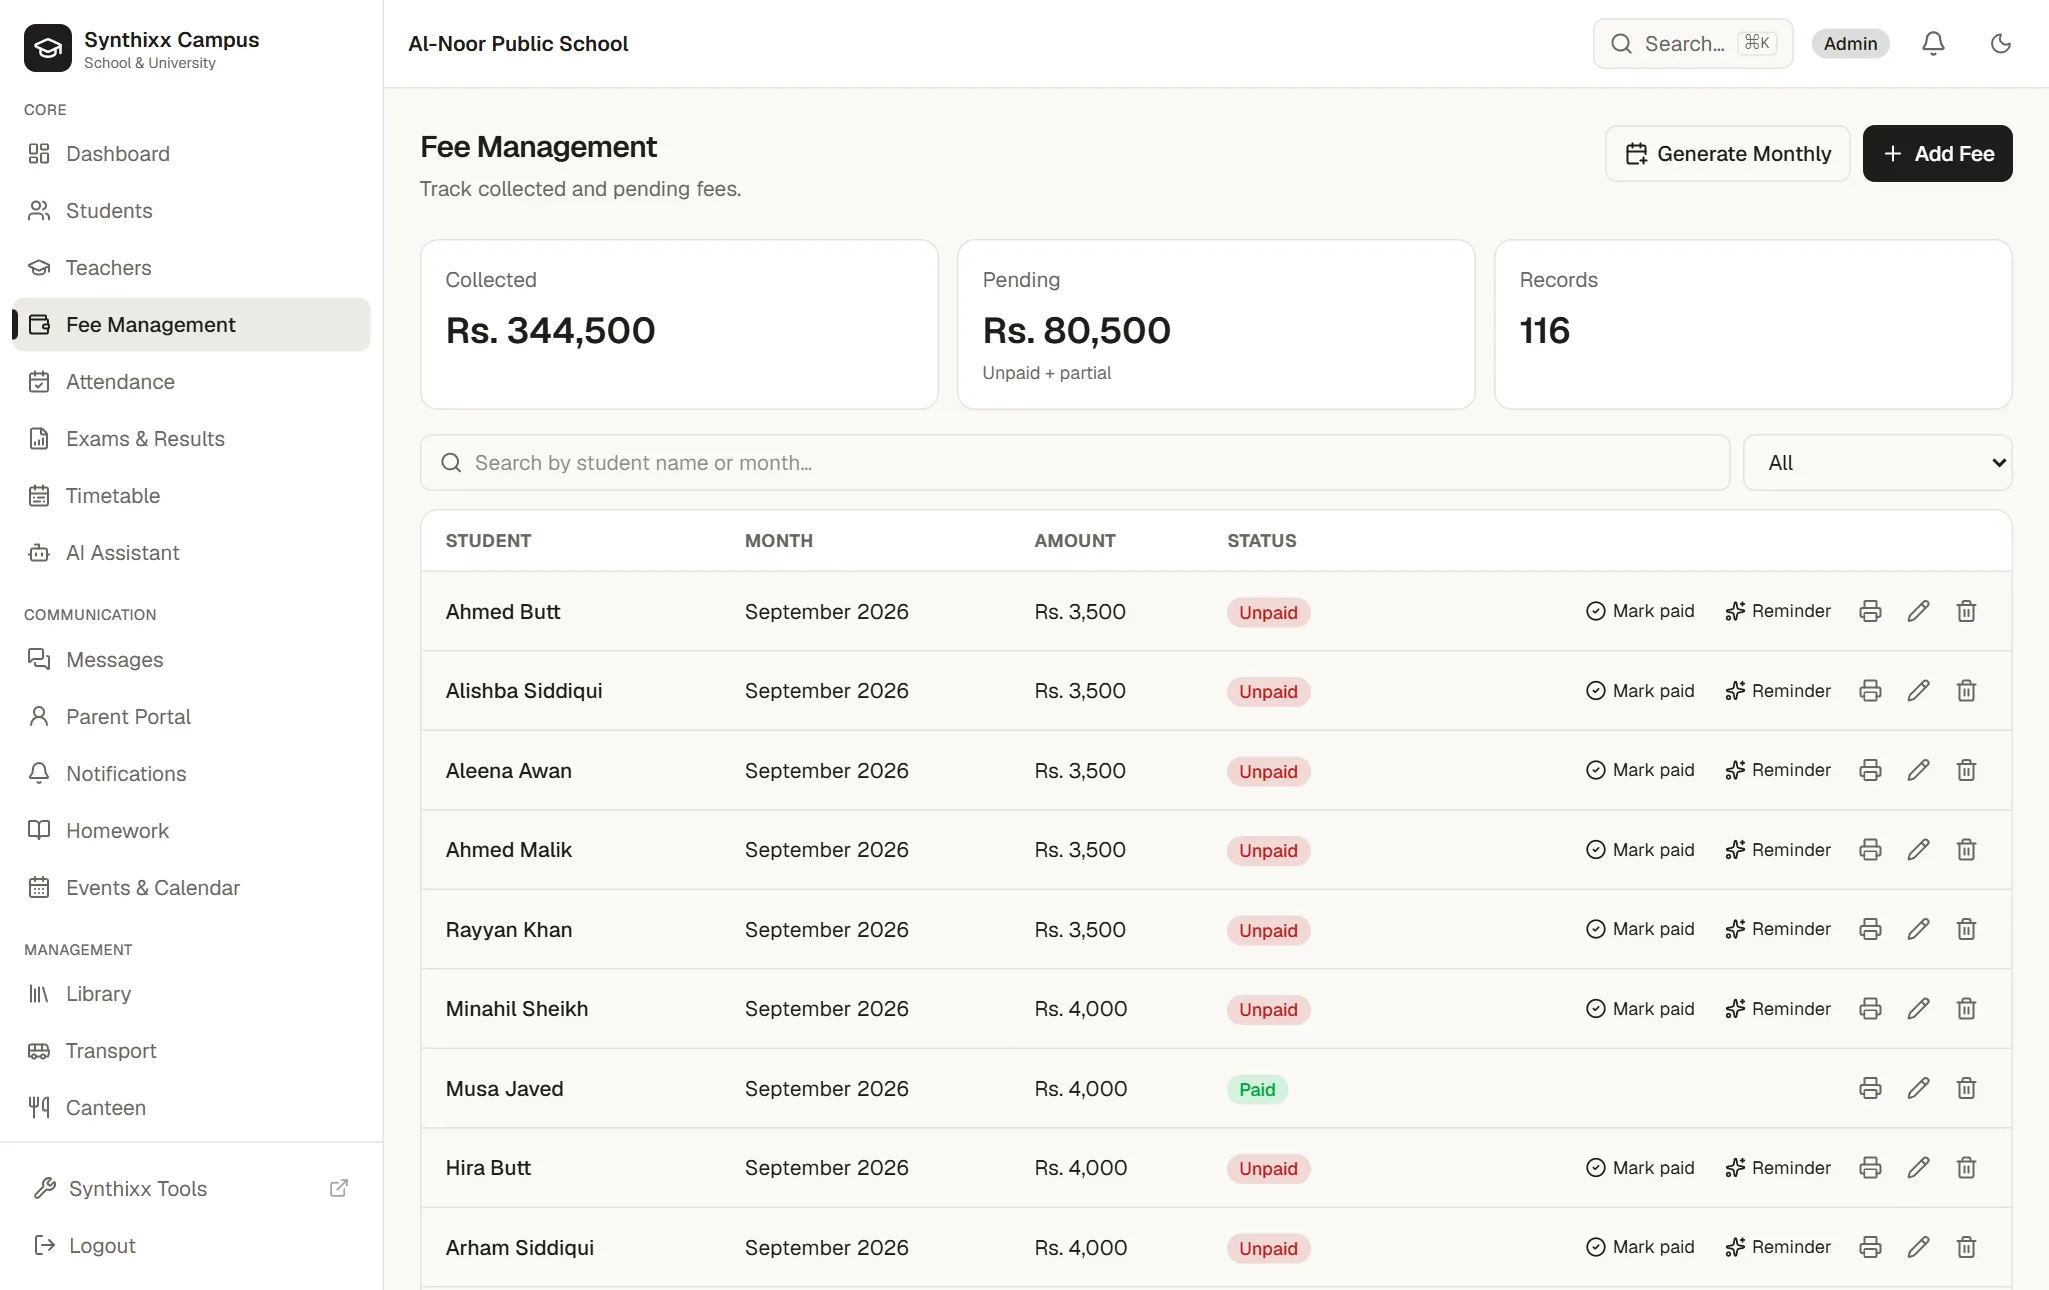
- 1Set each class's monthly fee once (per campus if you have branches).
- 2Press Generate Monthly and choose the month. Every active student gets their fee.
- 3When a family pays, press Mark paid on their fee, then Receipt to print a receipt with its number.
- 4Parents see what is due in their portal. The dashboard and the evening report show pending fees.
Step 9
Exams & results
Enter marks once and parents see them immediately.
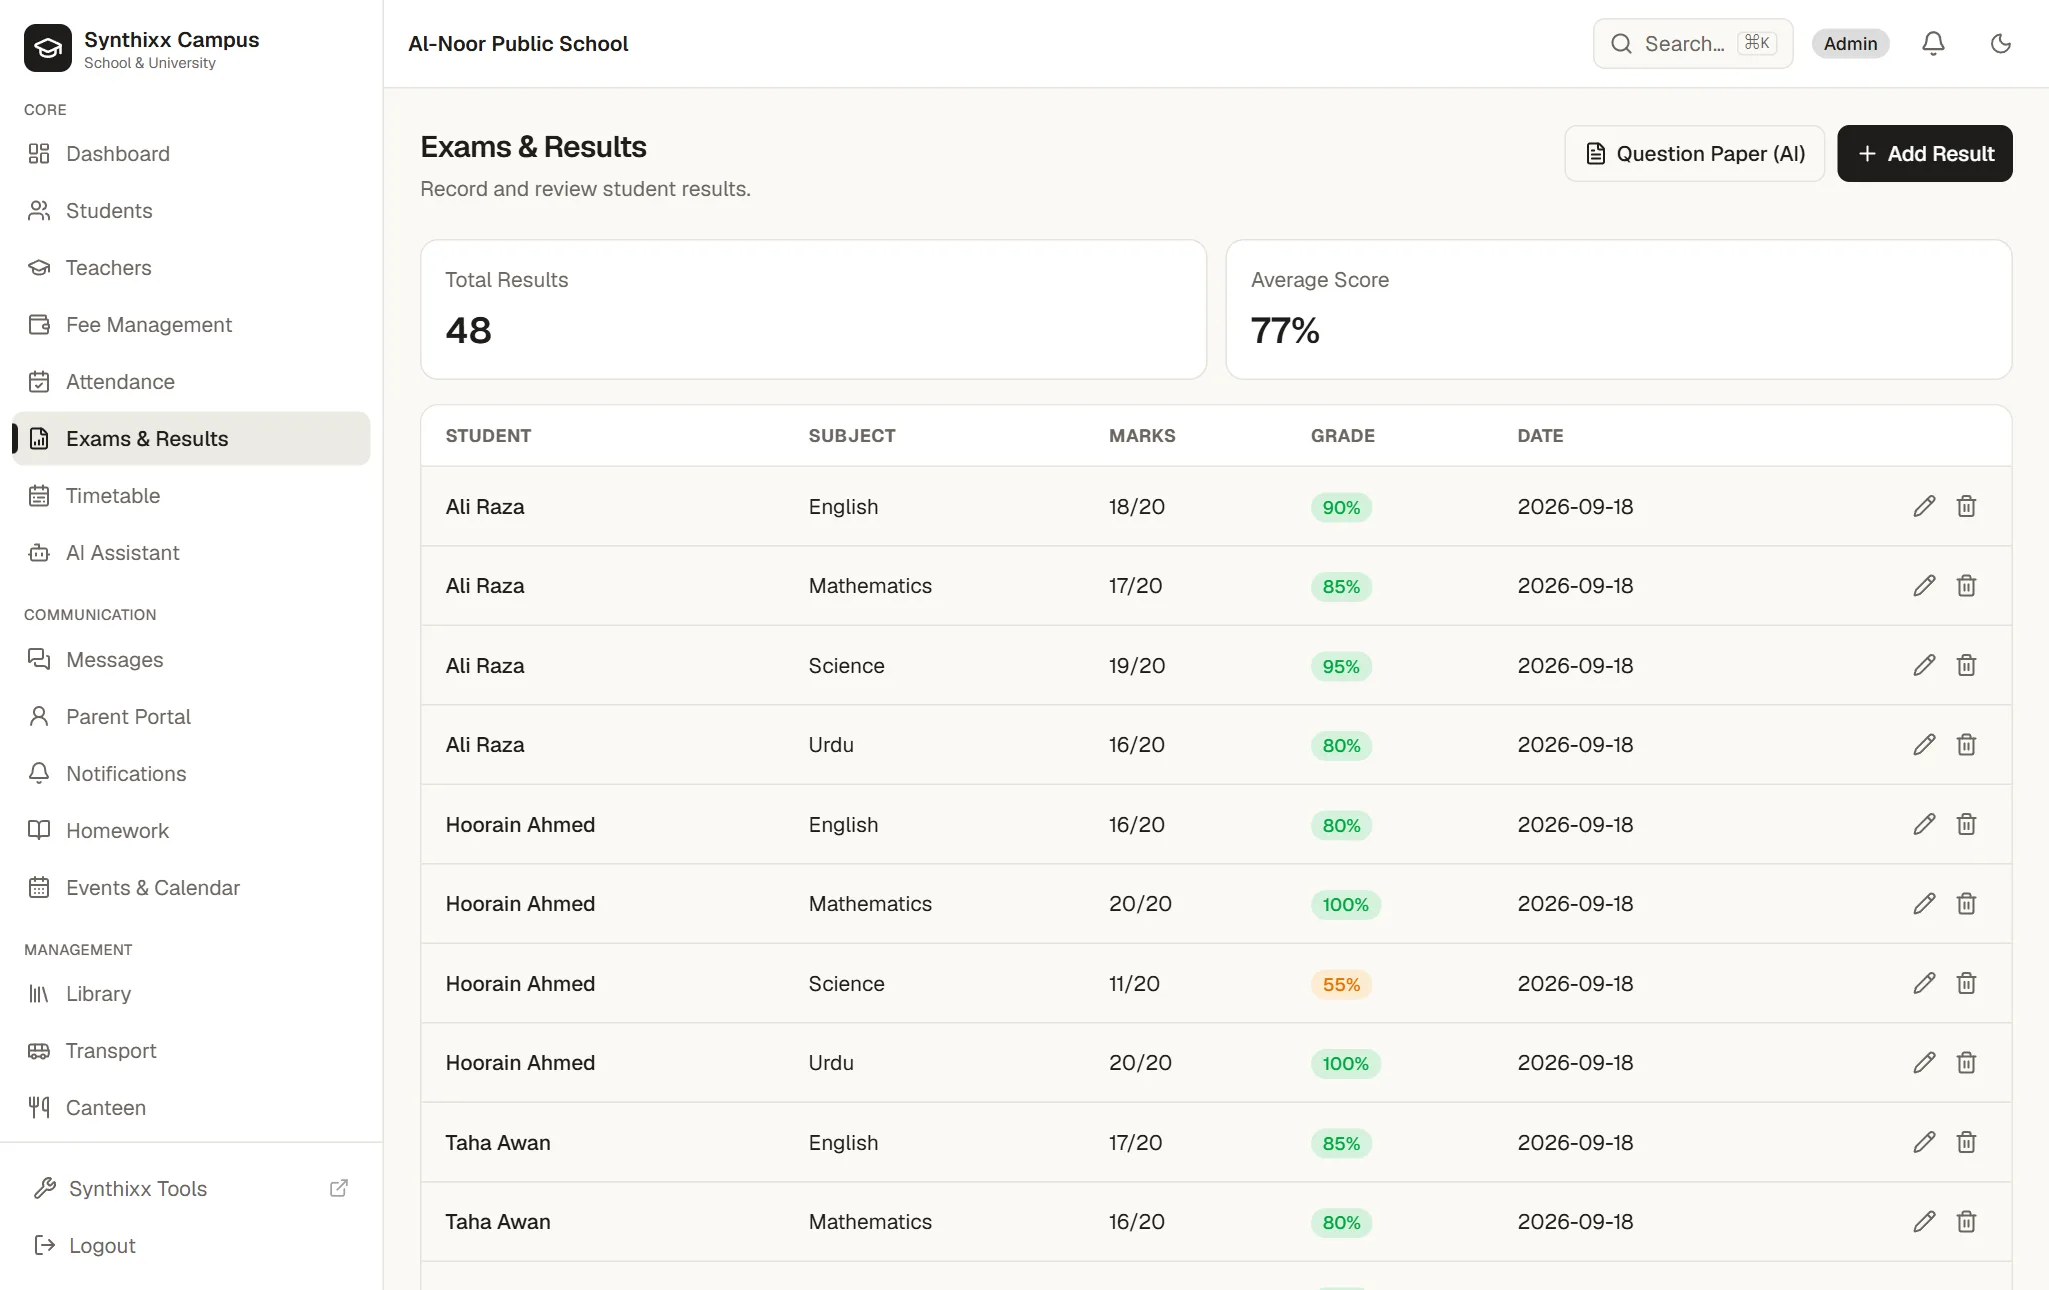
- 1Open Exams & Results, choose the class and subject, and enter marks out of the total.
- 2Grades and percentages are worked out for you. Print a Report Card from the Students page.
- 3Colleges and universities also get GPA, transcripts and an examination cell.
Step 10
Messages with parents
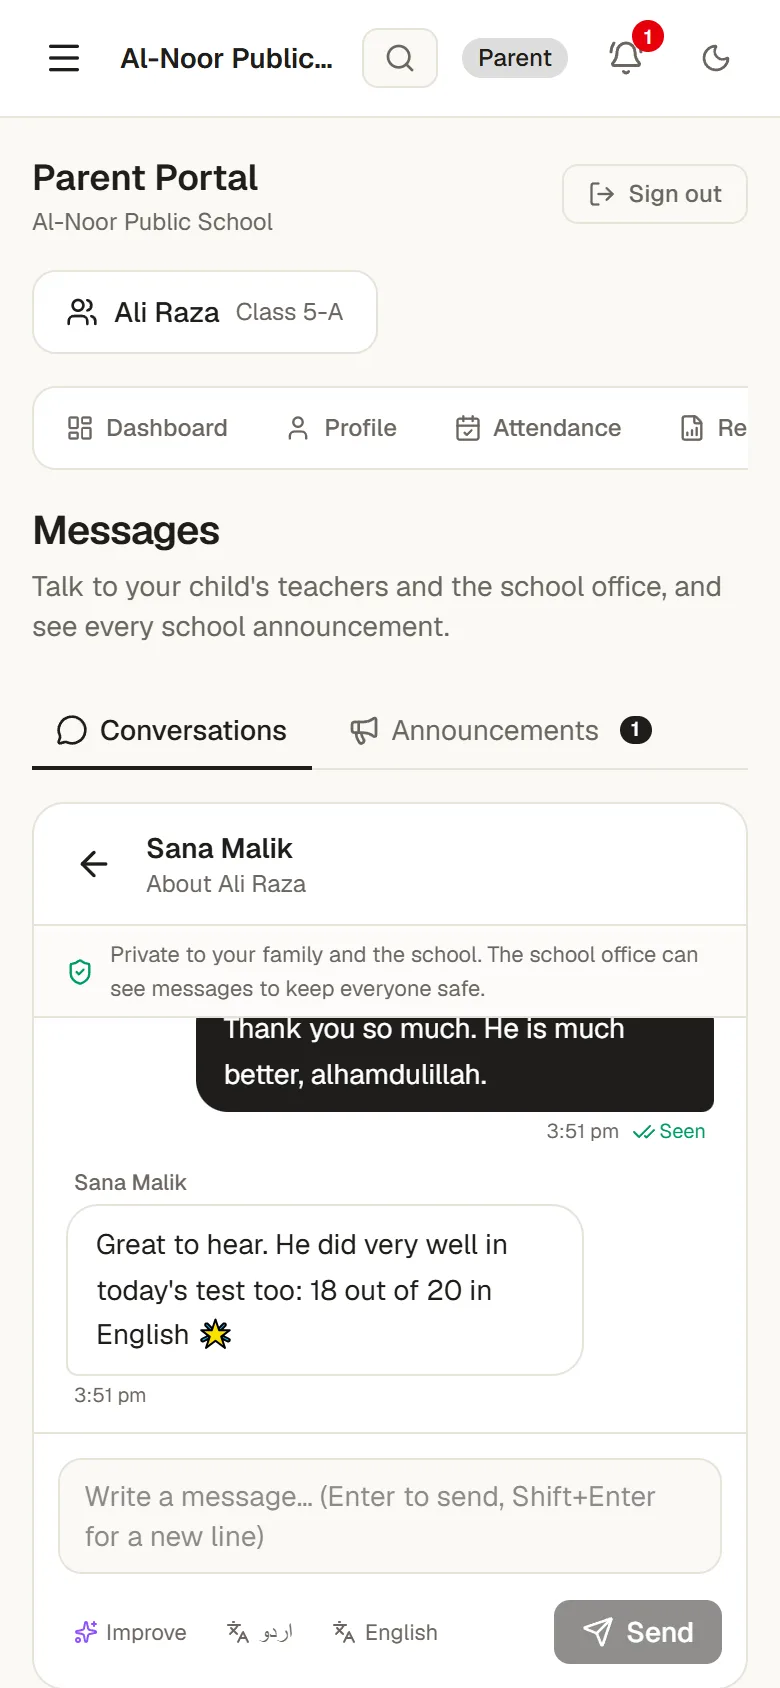
A private inbox between each family and their child's teachers or the school office, inside Synthixx. No personal phone numbers needed.
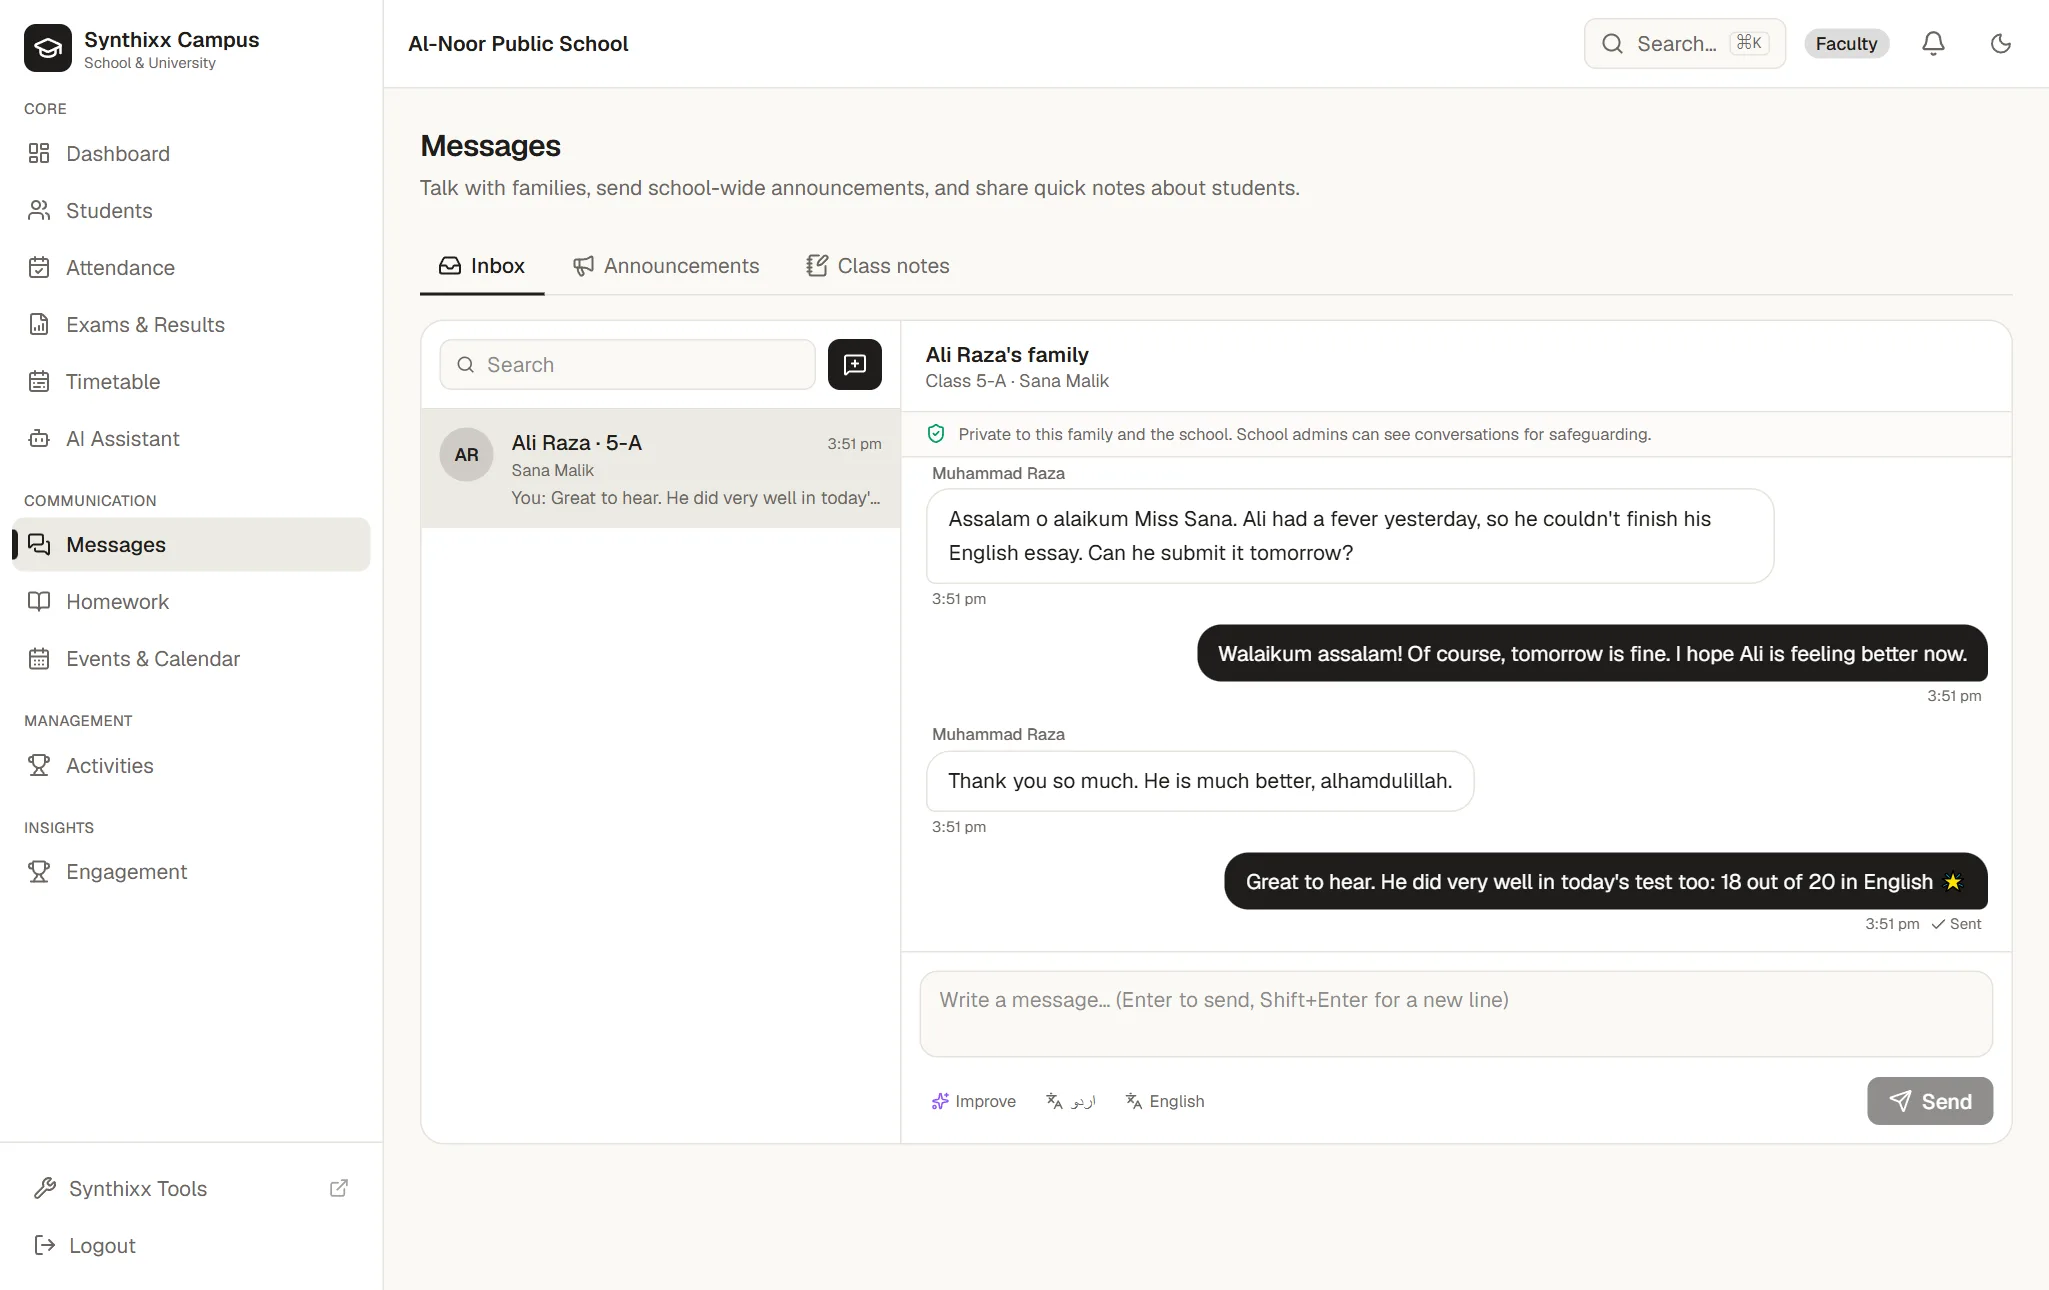
- 1Staff: open Messages. New messages from parents appear in the Inbox. Press the + button to start one about any student you teach.
- 2Parents can write to their child's class teacher, subject teachers or the School Office. Nobody else.
- 3Improve rewrites a message politely. اردو and English translate it. A parent can write in Roman Urdu and the teacher can read it in English.
- 4School admins can see every conversation to keep children safe, and families are told this. Anyone can report a message.
- 5Phone notifications for chats pause between 9 pm and 7 am. Messages still arrive in the inbox.
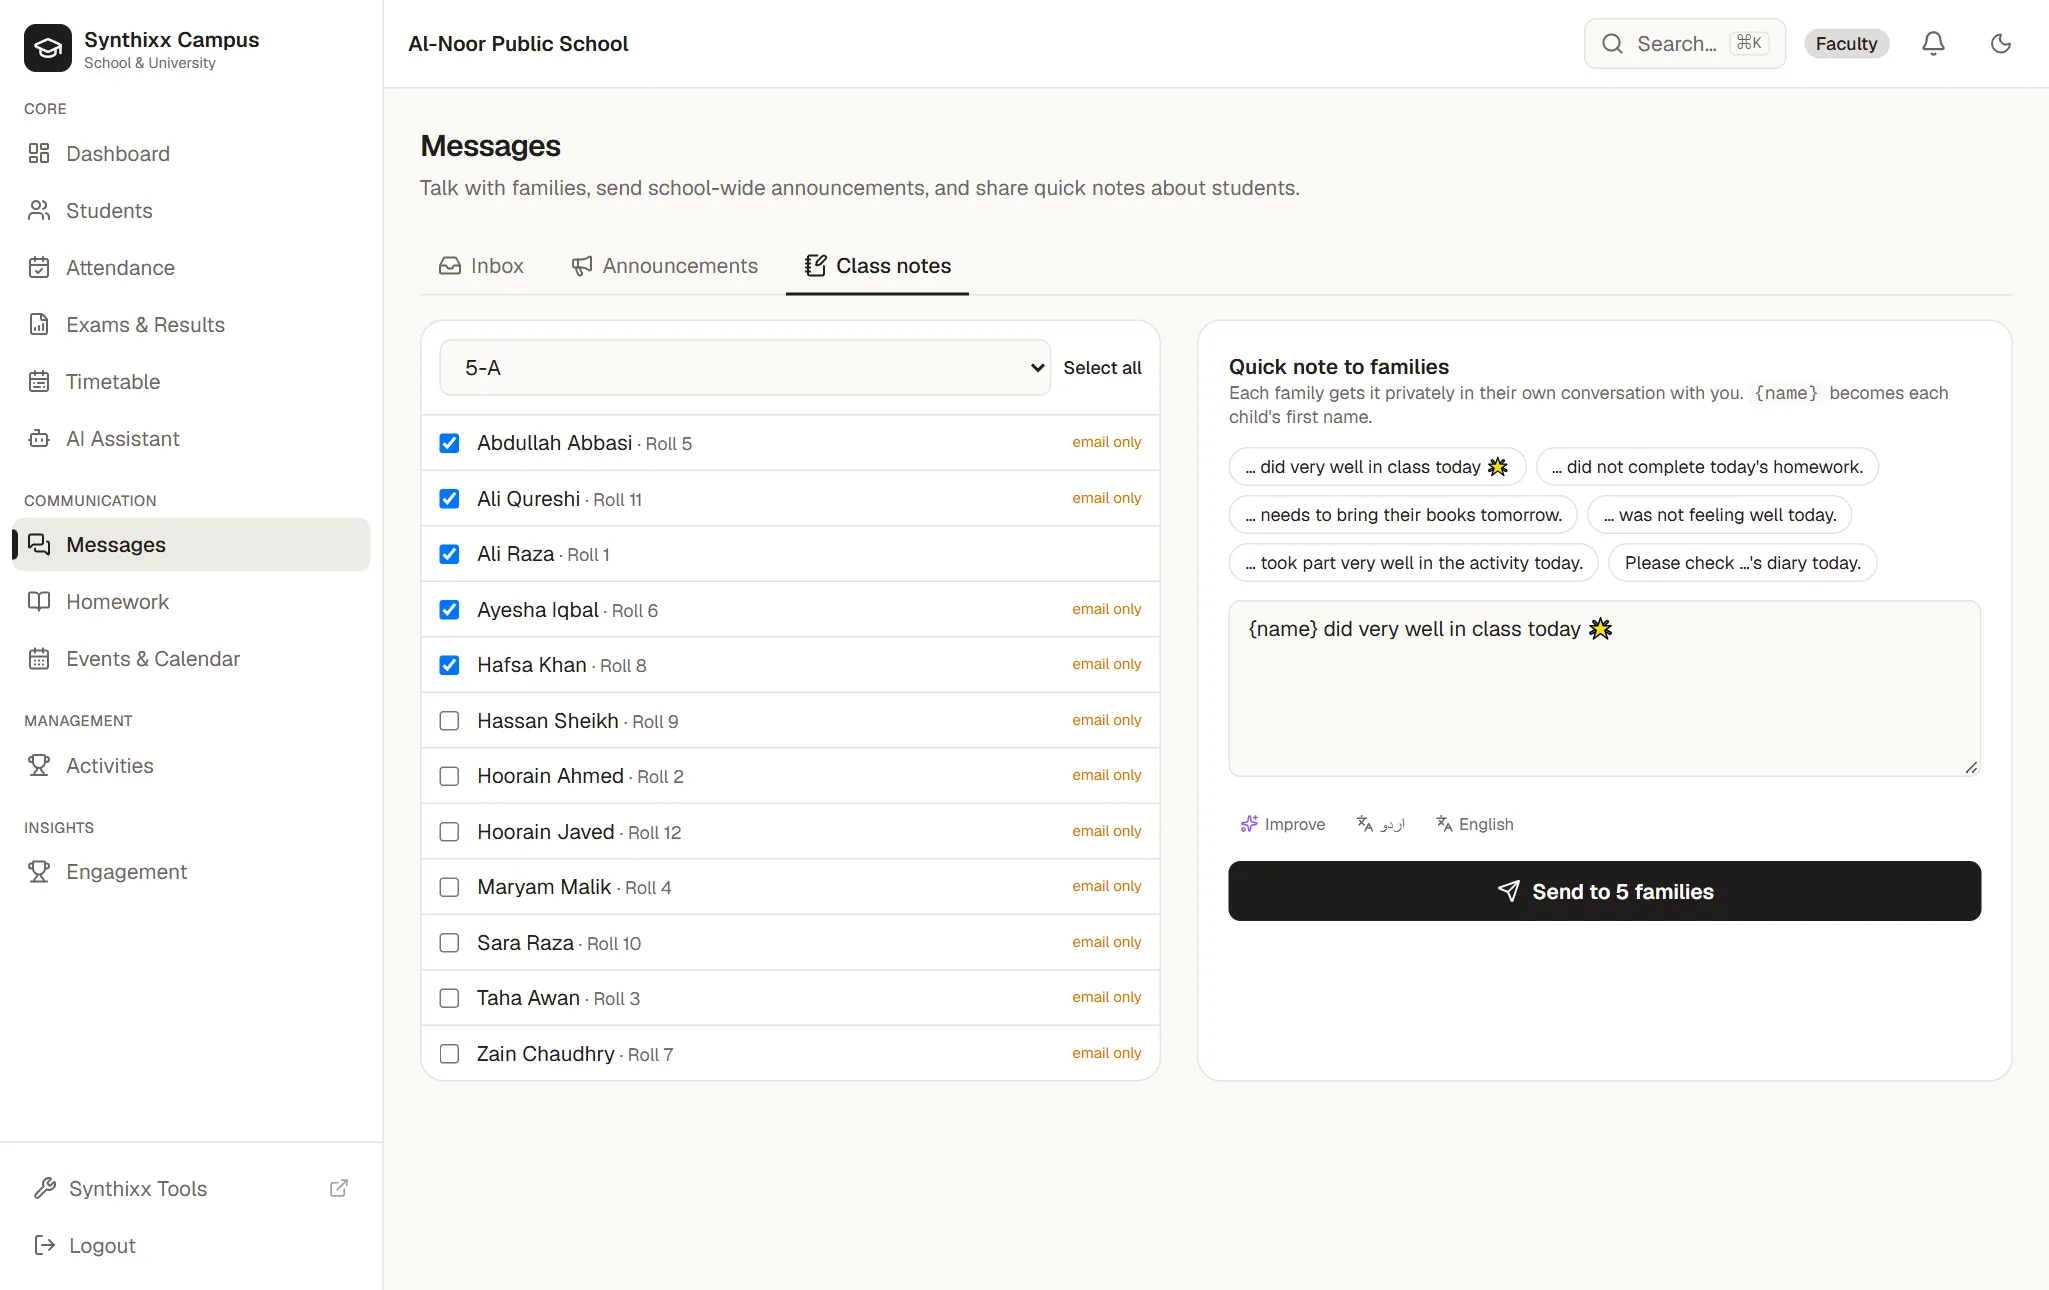
Class notes: one note, sent privately to many families
Step 11
Announcements
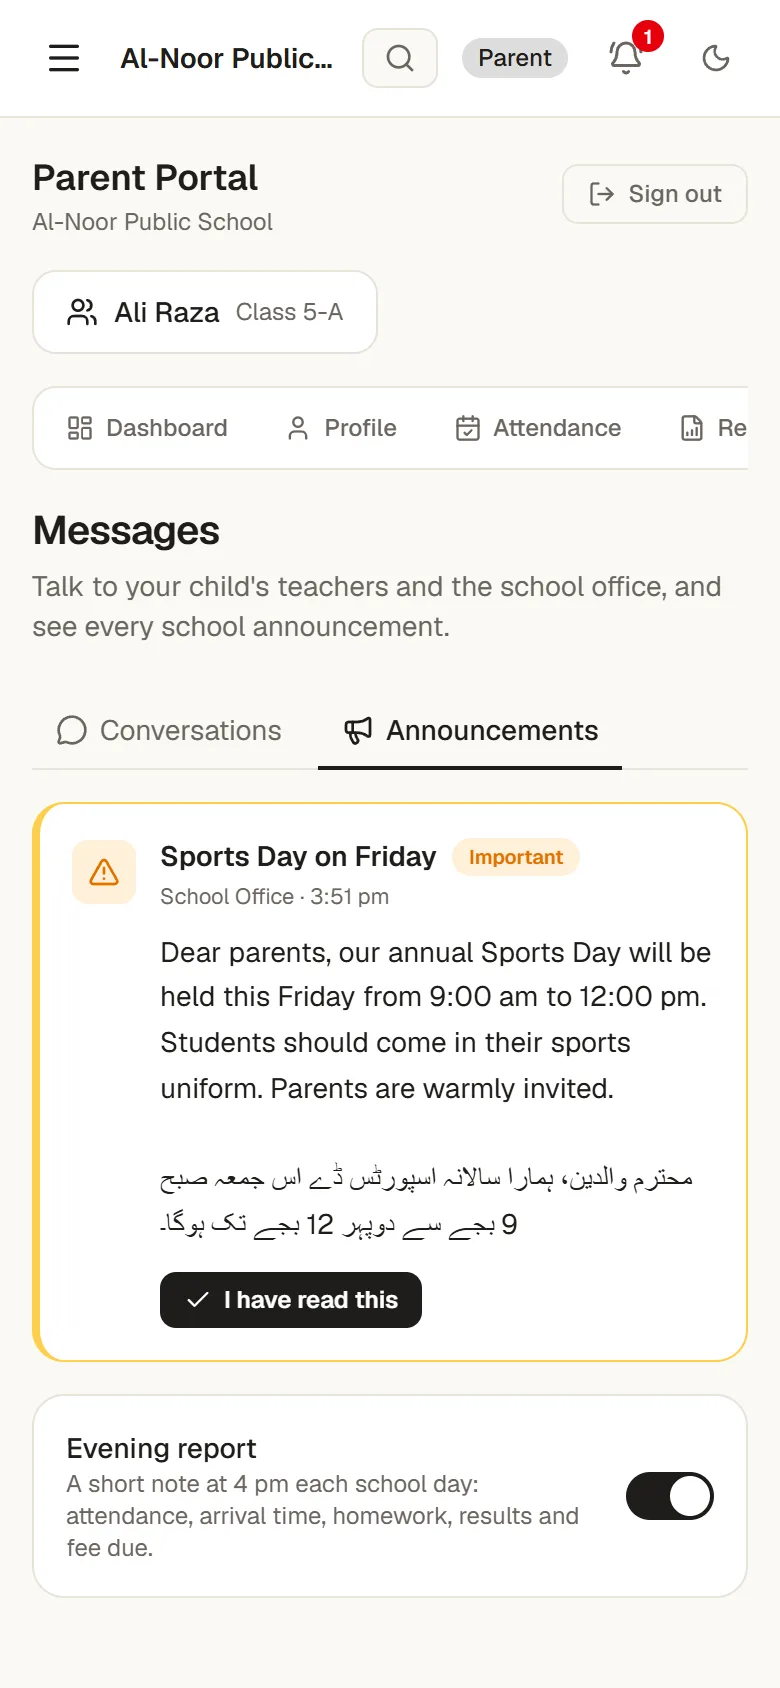
School closed tomorrow? An emergency? Tell every parent at once and see who has read it.
- 1Open Messages → Announcements. Use a ready template (School closed, Early dismissal, Emergency, Holiday, Parent-teacher meeting, Fee reminder).
- 2Or type a rough note in any language in Write it for me, like “kal barish ki wajah se school band”. The AI drafts a clear English message with an Urdu version.
- 3Choose how urgent it is (Normal, Important or Emergency) and who gets it: all families, some classes, and/or staff.
- 4Tick Ask families to confirm for important notices. Parents get an “I have read this” button.
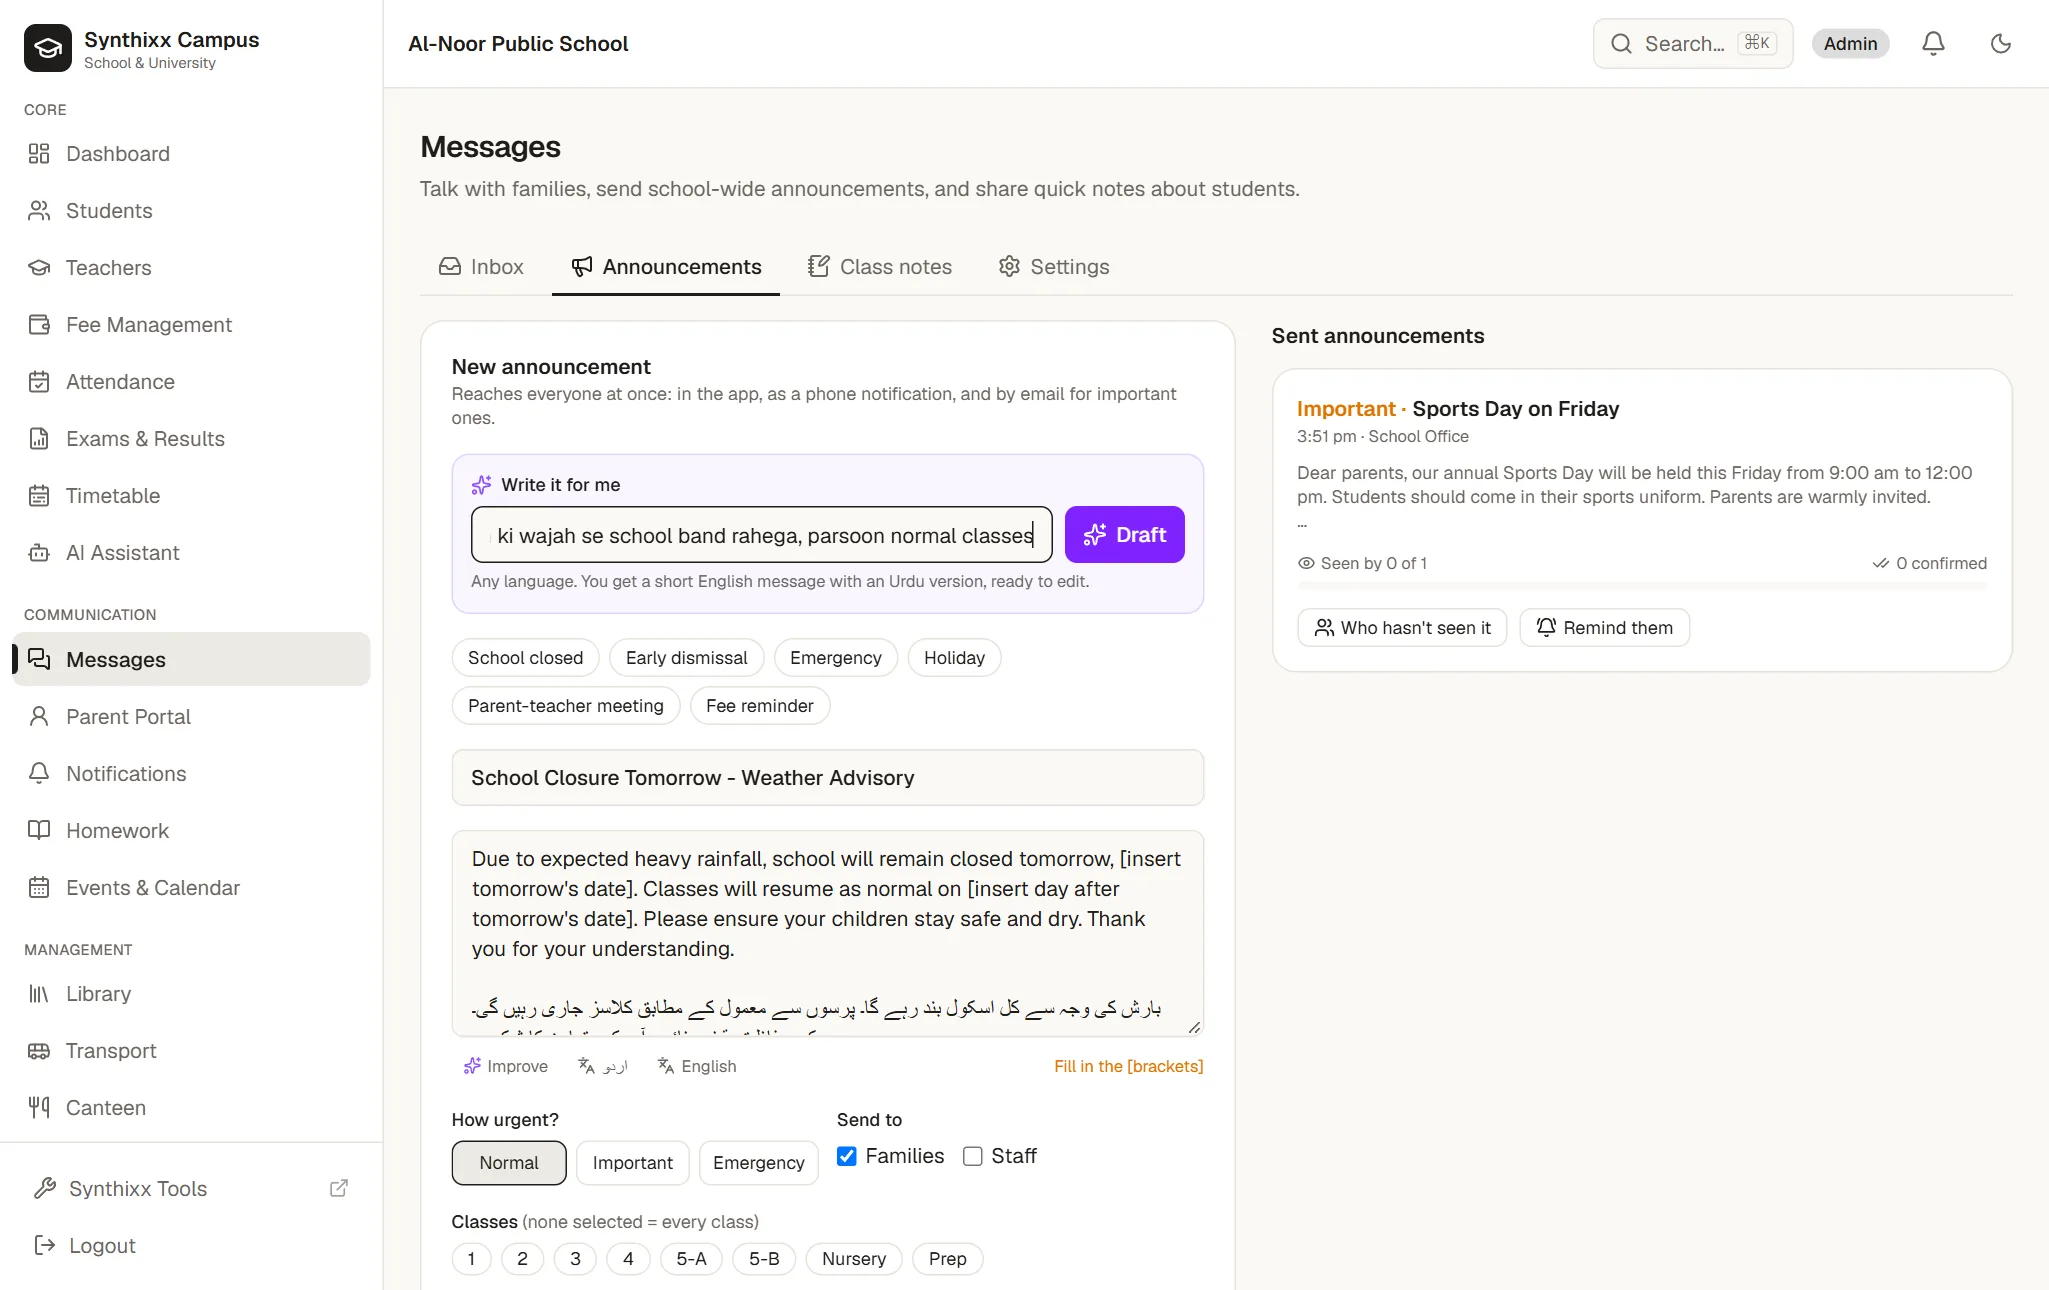
Each sent announcement shows Seen by X of Y. Press Who hasn't seen it for names like “Parent of Ali Raza (5-A)”, and Remind them to send a reminder only to them.
Step 12
The evening report
Every school day at 4 pm, each family gets one short note about their child, automatically.
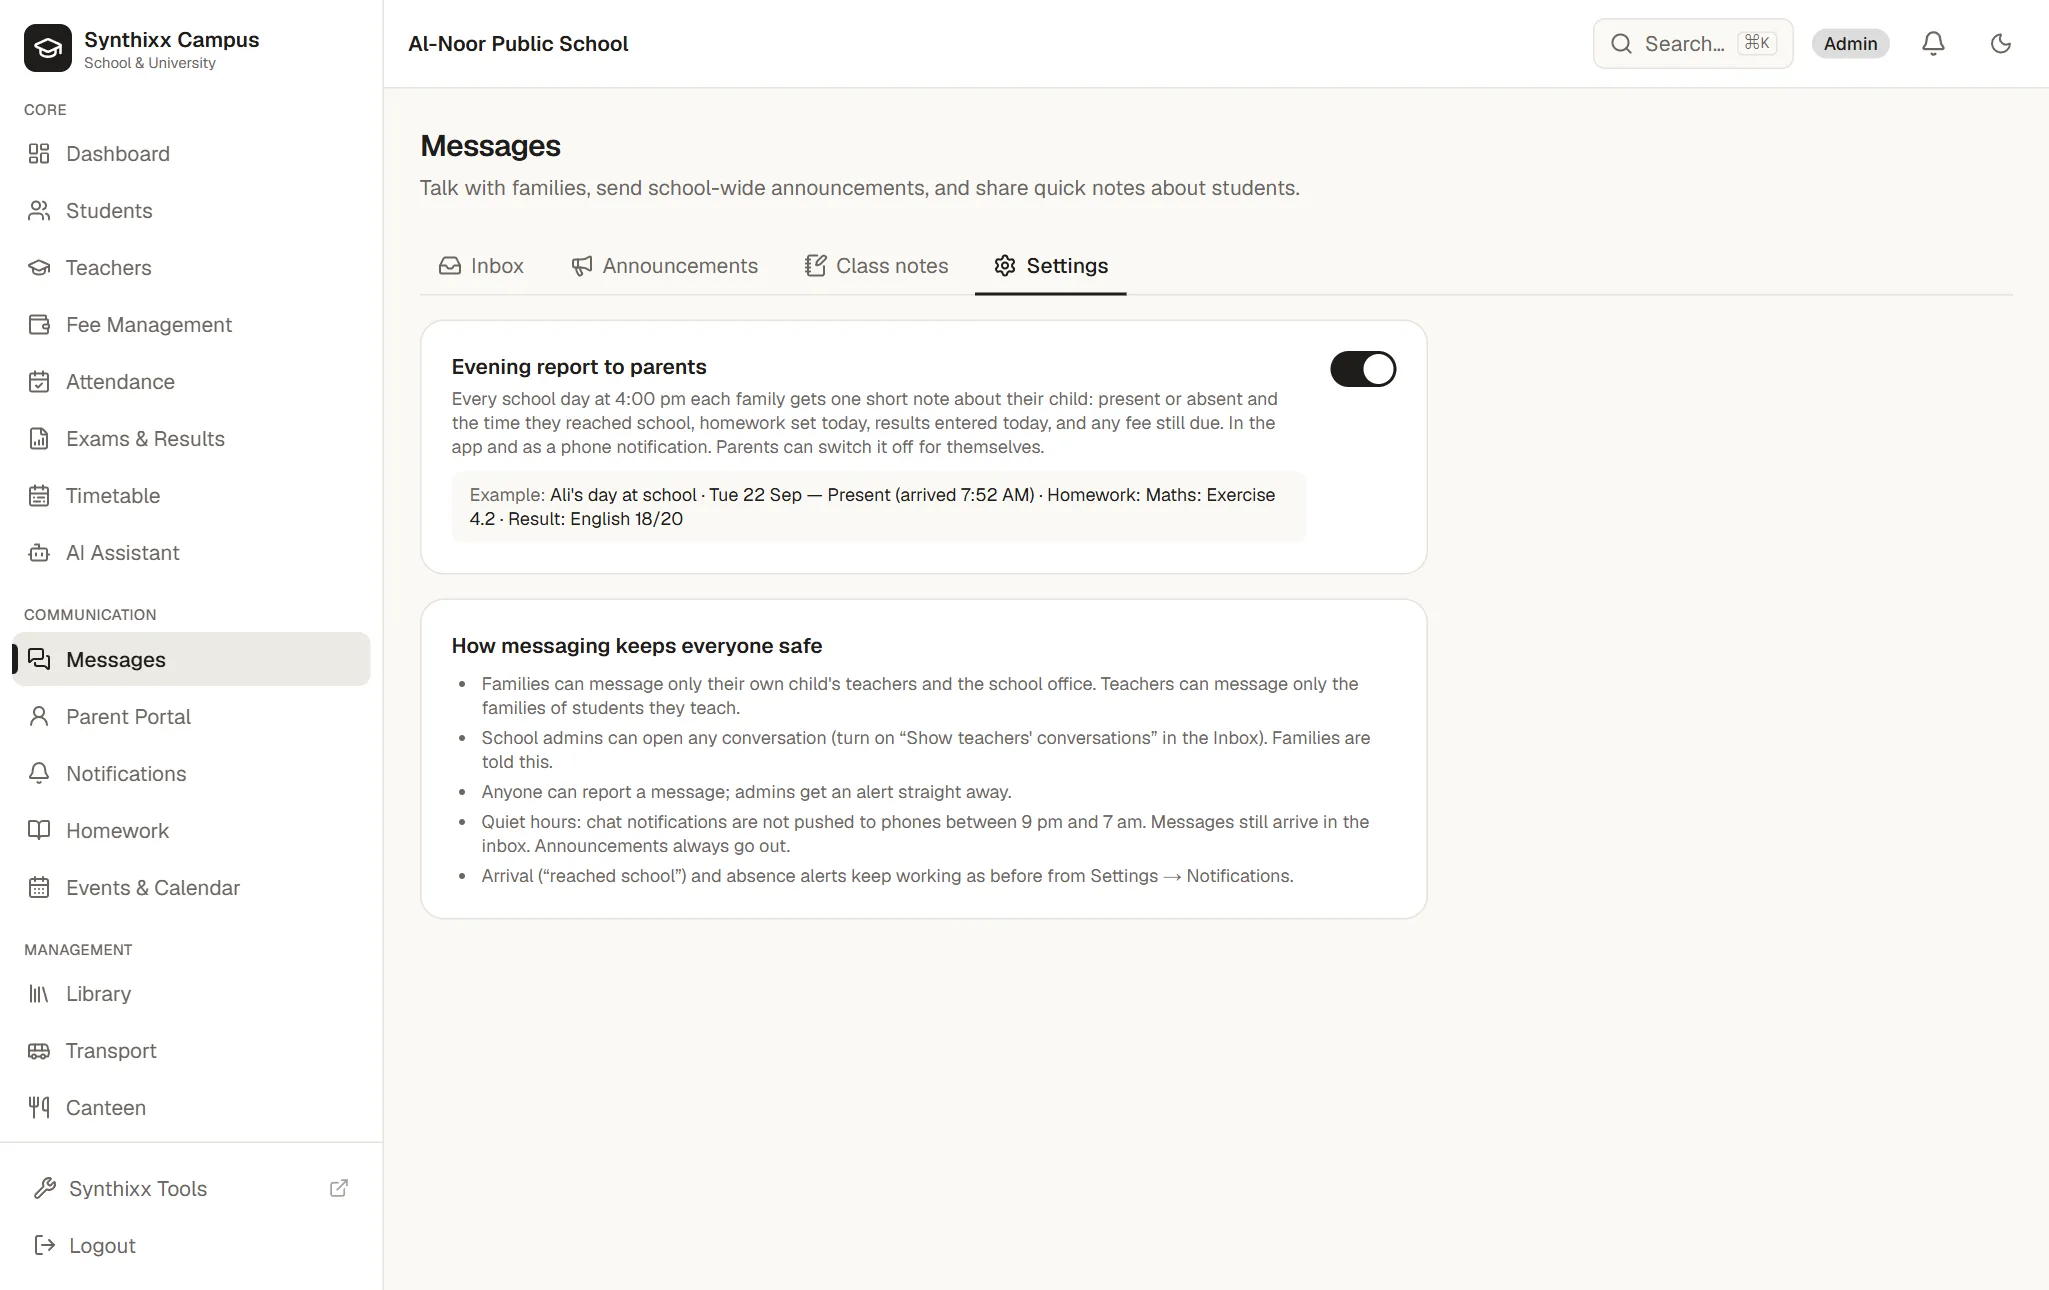
Ali's day at school · Tue 22 Sep
Present (arrived 7:52 AM) · Homework: Maths: Exercise 4.2 · Result: English 18/20 · Fee due: Rs 4,000
Only children with something to report get one, and never twice a day. Parents can switch it off for themselves.
Step 13
For parents & students
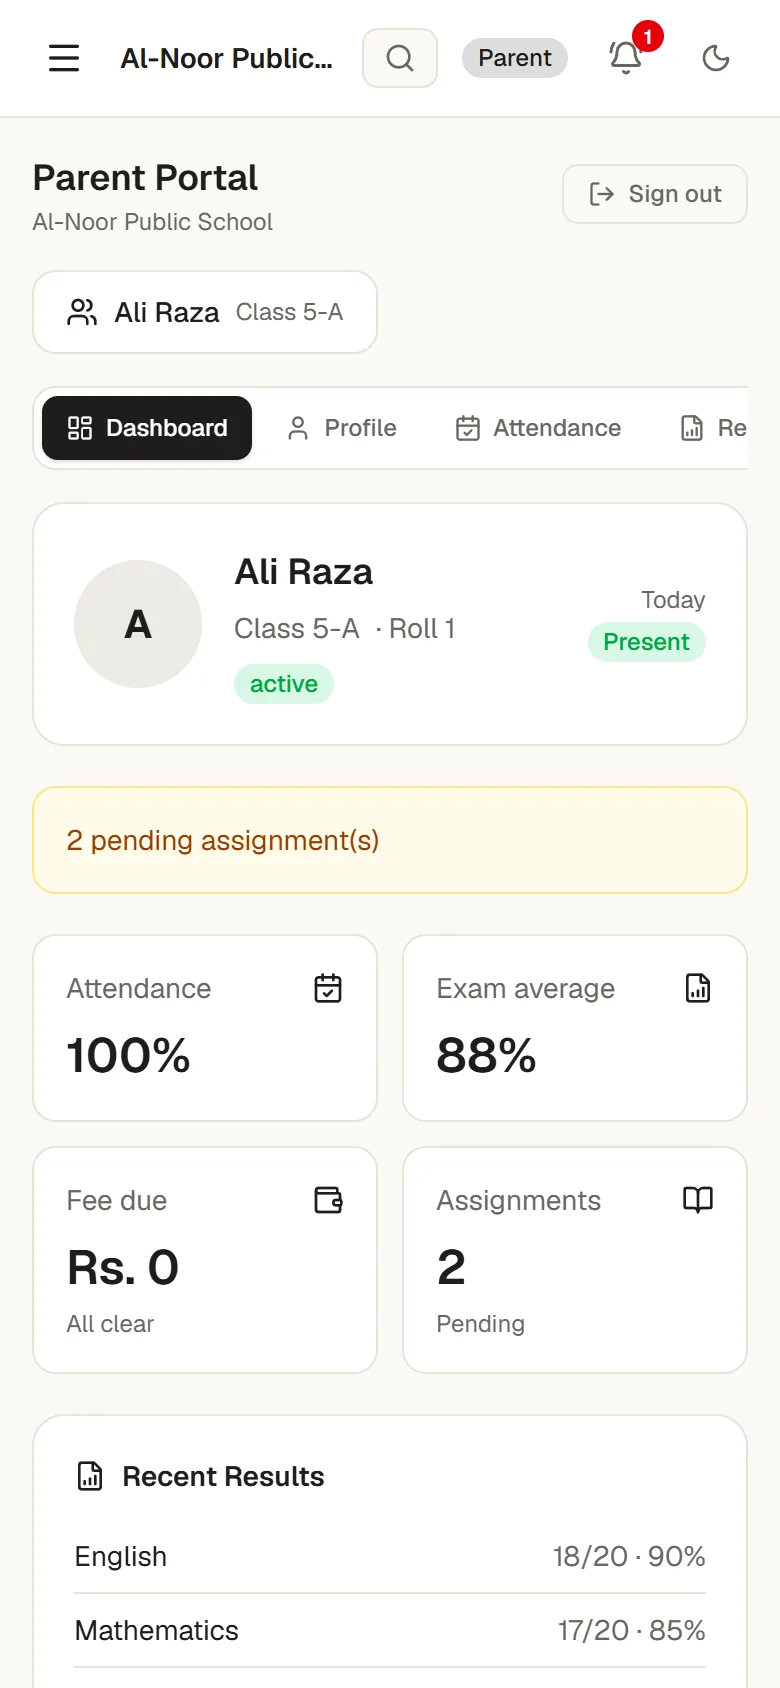
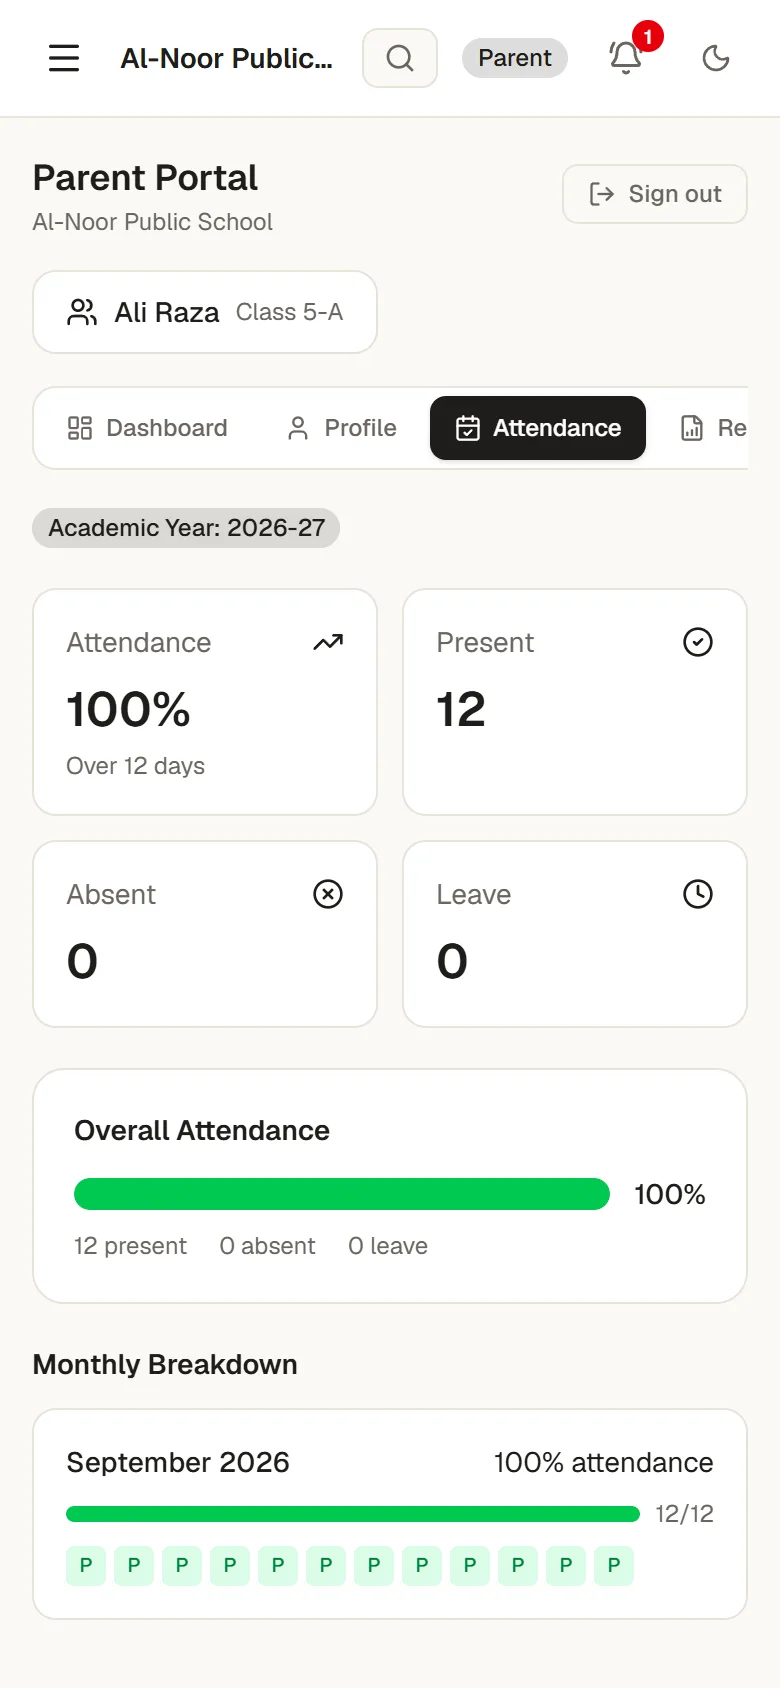
Families use Synthixx on their phone. No app store download needed.
- 1Go to school.synthixx.com/student-login and enter the school code and the child's Student ID code from the slip.
- 2The portal shows today's attendance, results, fees due, homework and notices, for that child only.
- 3The Messages tab is the family's inbox: chat with teachers and the office, and read school announcements.
Step 14
Install the app on your phone
Synthixx installs from the website, like an app, with phone notifications.
Android (Chrome)
- 1Open school.synthixx.com and sign in.
- 2Tap ⋮ → Install app (or Add to Home screen).
- 3Allow notifications when asked.
iPhone (Safari)
- 1Open school.synthixx.com in Safari and sign in.
- 2Tap Share → Add to Home Screen.
- 3Open it from the home screen and allow notifications.
Step 15
Plans & payment
Pay monthly or yearly (yearly is cheaper). Payment is by JazzCash, EasyPaisa, NayaPay or bank transfer.
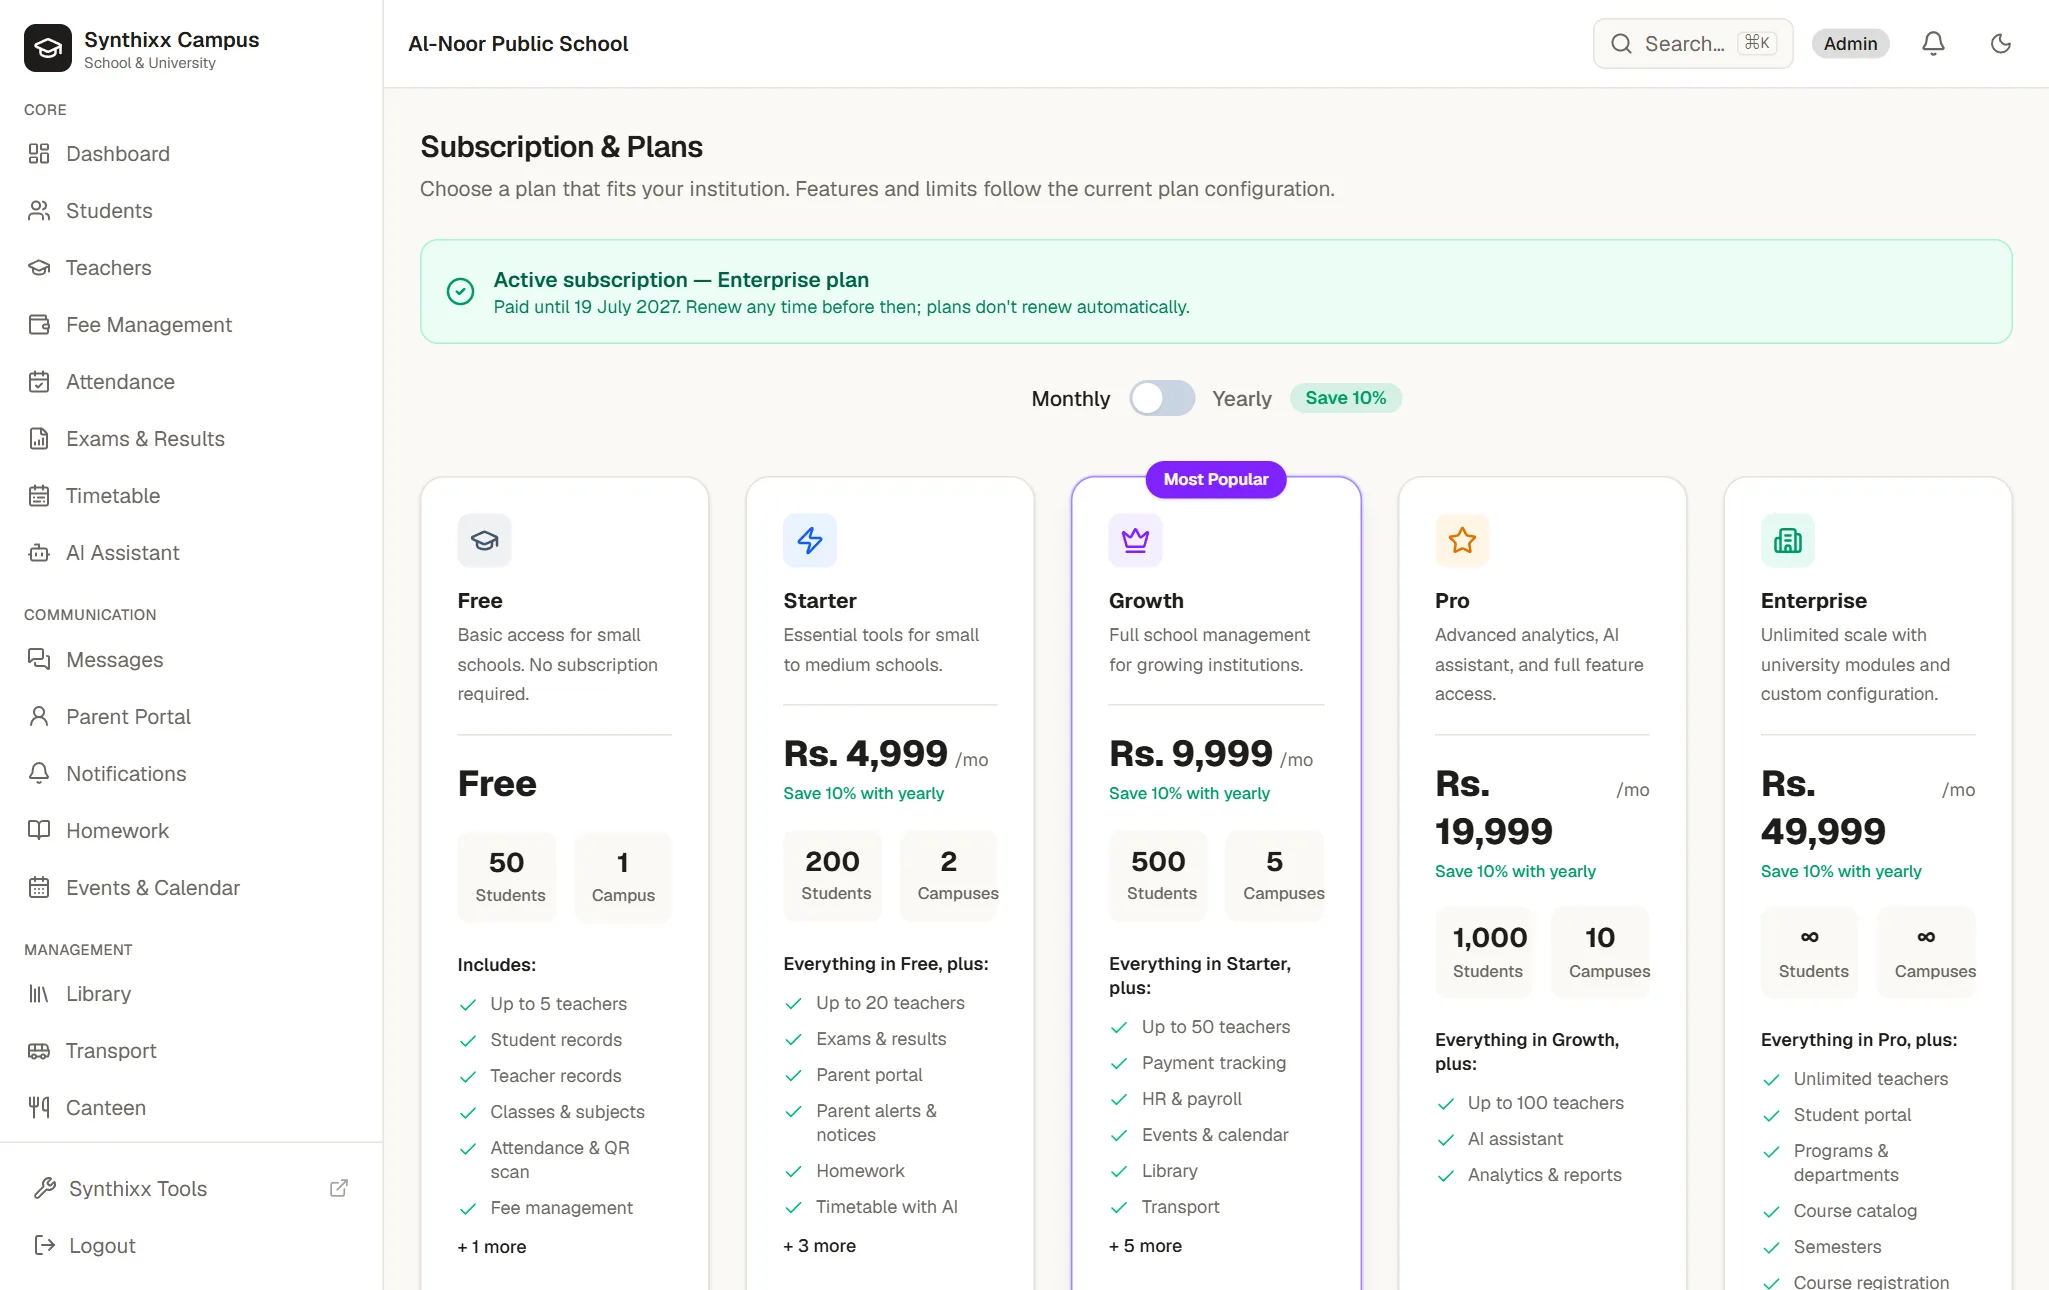
- 1Open Administration → Subscription & Plans and choose a plan.
- 2Send the exact amount shown to the account on screen, then enter the transaction ID.
- 3We verify it (usually within a few hours) and the plan starts. You'll get reminders before it ends, and if it does end, your data is never deleted. The school simply moves to the Free plan until you renew.
Step 16
Common questions
Is our data safe?
Every school's data is kept separate. Anything deleted goes to a recycle bin first, every school is backed up every night, and admins can download a full backup any time.
Can a teacher see other classes?
No. Teachers see and message only the classes they teach. The principal decides each person's role.
A parent forgot their code. What now?
Open Students → Login codes, find the child, and print or reset their code.
We have more than one branch.
Add each branch in Campuses. Branch staff see only their branch; head office sees everything.
Can we use Urdu?
Yes. Messages and announcements can be written in Urdu or Roman Urdu, and the AI can translate between Urdu and English.
Ready to set up your school?
Start free today. Need help? Use the chat bubble, the contact page or info@synthixx.com.